REVISED – HOWTO: Grab the all file download links on a HP Inc driver download page and wget them

About 3 months ago, I posted how to grab all the download links on a HP Inc driver download page and wget them.  After some messing around, I decided to take my previously posted instructions (which you can find here) and turn them into a pair of macros for Notepad++ to save some manual labor.  Below is the content of the two macros.  I also assigned ALT+F12 to the first macro, and ALT+F10 to the second macro.  And finally I assigned ALT+F11 to the Hex to Ascii plugin.

So now all I need to do is open Notepad++, paste the HP Inc’s driver download page’s source into Notepad++ and hit ALT+F12, ALT+F11, and then ALT+F10 to get my wget links.

To use these two macro’s, you’ll need to edit %AppData%\Notepad++\shortcuts.xml and insert these two macros, then save shortcuts.xml.  You also need to close Notepad++ and reopen it before using the macros.

Macro #1 – HP Inc Download Source Cleanup Part 1 – ALT+F12

<Macro name="HP Inc Download Source Cleanup Part 1" Ctrl="no" Alt="yes" Shift="no" Key="123">
<Action type="3" message="1700" wParam="0" lParam="0" sParam="" />
<Action type="3" message="1601" wParam="0" lParam="0" sParam="#" />
<Action type="3" message="1625" wParam="0" lParam="1" sParam="" />
<Action type="3" message="1602" wParam="0" lParam="0" sParam="" />
<Action type="3" message="1702" wParam="0" lParam="768" sParam="" />
<Action type="3" message="1701" wParam="0" lParam="1609" sParam="" />
<Action type="3" message="1700" wParam="0" lParam="0" sParam="" />
<Action type="3" message="1601" wParam="0" lParam="0" sParam="\t" />
<Action type="3" message="1625" wParam="0" lParam="1" sParam="" />
<Action type="3" message="1602" wParam="0" lParam="0" sParam="" />
<Action type="3" message="1702" wParam="0" lParam="768" sParam="" />
<Action type="3" message="1701" wParam="0" lParam="1609" sParam="" />
<Action type="3" message="1700" wParam="0" lParam="0" sParam="" />
<Action type="3" message="1601" wParam="0" lParam="0" sParam='&apos;&quot;&gt;\r\n' />
<Action type="3" message="1625" wParam="0" lParam="1" sParam="" />
<Action type="3" message="1602" wParam="0" lParam="0" sParam="\r\n" />
<Action type="3" message="1702" wParam="0" lParam="768" sParam="" />
<Action type="3" message="1701" wParam="0" lParam="1609" sParam="" />
<Action type="3" message="1700" wParam="0" lParam="0" sParam="" />
<Action type="3" message="1601" wParam="0" lParam="0" sParam='&quot;&gt;\r\n' />
<Action type="3" message="1625" wParam="0" lParam="1" sParam="" />
<Action type="3" message="1602" wParam="0" lParam="0" sParam="\r\n" />
<Action type="3" message="1702" wParam="0" lParam="768" sParam="" />
<Action type="3" message="1701" wParam="0" lParam="1609" sParam="" />
<Action type="3" message="1700" wParam="0" lParam="0" sParam="" />
<Action type="3" message="1601" wParam="0" lParam="0" sParam="obtainSoftware?url=" />
<Action type="3" message="1625" wParam="0" lParam="1" sParam="" />
<Action type="3" message="1602" wParam="0" lParam="0" sParam="\r\n###" />
<Action type="3" message="1702" wParam="0" lParam="768" sParam="" />
<Action type="3" message="1701" wParam="0" lParam="1609" sParam="" />
<Action type="0" message="2013" wParam="0" lParam="0" sParam="" />
<Action type="2" message="0" wParam="42043" lParam="0" sParam="" />
<Action type="2" message="0" wParam="42056" lParam="0" sParam="" />
<Action type="2" message="0" wParam="42059" lParam="0" sParam="" />
<Action type="3" message="1700" wParam="0" lParam="0" sParam="" />
<Action type="3" message="1601" wParam="0" lParam="0" sParam="^###" />
<Action type="3" message="1625" wParam="0" lParam="2" sParam="" />
<Action type="3" message="1702" wParam="0" lParam="784" sParam="" />
<Action type="3" message="1701" wParam="0" lParam="1615" sParam="" />
<Action type="2" message="0" wParam="43051" lParam="0" sParam="" />
<Action type="3" message="1700" wParam="0" lParam="0" sParam="" />
<Action type="3" message="1601" wParam="0" lParam="0" sParam="###" />
<Action type="3" message="1625" wParam="0" lParam="1" sParam="" />
<Action type="3" message="1602" wParam="0" lParam="0" sParam="" />
<Action type="3" message="1702" wParam="0" lParam="768" sParam="" />
<Action type="3" message="1701" wParam="0" lParam="1609" sParam="" />
<Action type="0" message="2013" wParam="0" lParam="0" sParam="" />
<Action type="2" message="0" wParam="43008" lParam="0" sParam="" />
</Macro>

Macro #2 – HP Inc Download Source Cleanup Part 2 – ALT+F10

<Macro name="HP Inc Download Source Cleanup Part 2" Ctrl="no" Alt="yes" Shift="no" Key="121">
<Action type="3" message="1700" wParam="0" lParam="0" sParam="" />
<Action type="3" message="1601" wParam="0" lParam="0" sParam="http:" />
<Action type="3" message="1625" wParam="0" lParam="1" sParam="" />
<Action type="3" message="1602" wParam="0" lParam="0" sParam="\r\nwget -c -N -T 20 -t 20 http:" />
<Action type="3" message="1702" wParam="0" lParam="896" sParam="" />
<Action type="3" message="1701" wParam="0" lParam="1609" sParam="" />
<Action type="0" message="2318" wParam="0" lParam="0" sParam="" />
<Action type="1" message="2170" wParam="0" lParam="0" sParam="" />
</Macro>

As always – Use any tips, tricks, or scripts I post at your own risk.

HOWTO: Change a Windows’ network type from Public to Private via PowerShell

Stupid Windows Server 2016…  Stupid Windows 10…  Damn Microsoft…

Ever find yourself with a network interface that is stuck as Public and no obvious way to change it via GUI?

2016-12-24-14-24-28-snagit-0024

Five simple PowerShell lines to the rescue!

Get-NetConnectionProfile
$Profile = Get-NetConnectionProfile -InterfaceAlias "interface_alias_name"
$Profile.NetworkCategory = "Private"
Set-NetConnectionProfile -InputObject $Profile
Get-NetConnectionProfile

2016-12-24-14-25-51-snagit-0025

2016-12-24-14-26-07-snagit-0026

And now your network type should be set to Private network.

As always – Use any tips, tricks, or scripts I post at your own risk.

HOWTO: Install the Veeam One v9.5 Monitor Client on a Domain Controller

Most of my client sites are smaller companies, with one, two or three hypervisor hosts and a single Windows 2012R2 physical installation to manage the hypervisor cluster, shared storage, and backups.  Typically we configure the 2012R2 physical installation as a domain controller, in addition to a pair of virtualized domain controllers on the hypervisor cluster.  We generally utilize Veeam Availability Suite for backup and cluster monitoring, with Veeam Backup & Replication being installed the 2012R2 physical instance and Veeam One being installed in a virtual machine.  When we need to manage something in the customer’s environment, we typically RDP the 2012R2 physical instance and do whatever we need from there.  This means we install all our management tools on there whenever we can.

This approach has always worked well for us except for when vendors decide to prevent installation of their software on domain controllers.  Now I won’t dispute that some software packages definitely deserved to be blocked from installing on a domain controller, but in this particular case, Veeam has decided that the Veeam One Monitor client is just too dangerous for a domain controller – huh?  Why?  It is just a client (no different than the vSphere vCenter client, or the Vertias Backup Exec console utility) that connects to another server where the software resides.  So what do you do when you still want to install the Veeam One v9.5 Monitor Client on a domain controller?  You edit the installer.  🙂

In Veeam One version 8 and 9, you needed to edit the veeam_monitor_cln_x64.msi installer and change the VmACheckIsDC entries in both the InstallExecuteSequence and InstallUISequence tables to True, then save the installer.  Then you could run the installer on your domain controller.

In Veeam One v9.5 however, Veeam has changed their checking logic, so the above steps no longer work.  The good news is that with v9.5, you only need to modify one table entry now instead of two.  So here are the necessary steps.

  1. Extract the VeeamONE.9.5.0.3201 iso image to a folder, then navigate to the extracted Monitor folder.
  2. Copy veeam_monitor_cln_x64.msi to veeam_monitor_cln_x64_dc_installer.msi
  3. Open veeam_monitor_cln_x64_dc_installer.msi with an msi editor such as Panataray’s SuperOrca
  4. Scroll down to the VMLaunchConditions table
  5. There you should find three entries, and one of them will have the following data: “MsiNTProductType <> 22016-11-21-10-39-00-snagit-0048
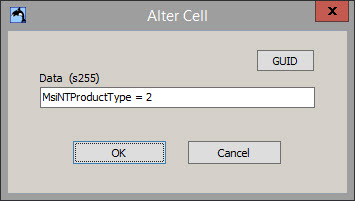
  6. Edit the entry and change “<>” to “=” so you end up with “MsiNTProductType = 22016-11-21-10-38-46-snagit-0047
  7. Save the msi and close your msi editor
  8. On your domain controller, launch the veeam_monitor_cln_x64_dc_installer.msi to install the Veeam One v9.5 Monitor client

As always – Use any tips, tricks, or scripts I post at your own risk.

HOWTO: Grab the all file download links on a HP Inc driver download page and wget them

So you have a brand new HP Inc machine to deploy, or you are finally getting around to upgrading to Windows 10…  You’ll need to download the drivers for that machine from HP Inc’s support site.  But you don’t want to use their 2 year old driver pack, kill your internet connection by launching 38 separate downloads at once from your browser, or babysit one or two downloads in the browser at a time (an all day task). Well here is a simple way to grab all the file download links at once and then use wget to sequentially get those files one after another – hands free in a command prompt.  All you need is Notepad++ and a copy of wget.exe somewhere in your machine’s system path.

I’ve had good luck with getting wget from here:  https://eternallybored.org/misc/wget/
And you can install Notepad++ using Ninite’s installer from here:  https://ninite.com/

Extract wget.exe and put it somewhere in your system path (i.e. C:\Windows).

Open your browser of choice, go to the HP Inc driver support download page for the product and OS version you need and then view the page’s source code in your browser (typically accomplished by right clicking the page and selecting “view page source”.

Copy the entire page’s source code (“CTRL + A” then “CTRL + C“) and paste it (“CTRL + V“) into an empty Notepad++ window, then hit “CTRL + H” to open Notepad++’s search/replace dialog box.

Click the “Extended Search Mode” radio button.

Search for: #
Replace with: {blank}
Hit the Replace All button
Tip – press CTRL + A then hit backspace or delete in the Replace with box to blank it’s contents

Search for: \t
Replace with: {blank}
Hit the Replace All button

Search for: ‘”>\r\n
Replace with: \r\n
Hit the Replace All button
Tip – this is an apostrophe, quote, greater than sign, backslash, r, backslash, n

Search for: “>\r\n
Replace with: \r\n
Hit the Replace All button
Tip – this is quote, greater than sign, backslash, r, backslash, n

Search for: obtainSoftware?url=
Replace with: \r\n###
Hit the Replace All button
Hit the Close button (on the replace dialog box)

Press “CTRL + A” to select all text

From the Edit drop down menu, select Blank Operations –> Trim Leading and Trailing Space
From the Edit drop down menu, select Blank Operations –> Remove Empty Lines (Containing blank characters)
From the Edit drop down menu, select Line Operations –> Sort Lines Lexicographically Ascending

Hit “CTRL + Home” to go to the top of the document

You should now see several lines that start with ###6874 – highlight just these lines and copy them with “CTRL + C“, then press “CTRL + N” to create a new document, then press “CTRL + V” to paste the copied lines into the new document.

Hit “CTRL + H” to open the replace dialog box again.

Search for: ###
Replace with: {blank}
Hit the Replace All button
Hit the Close button (on the replace dialog box)

Press “CTRL + A” to select all text

From the Notepad++ Plugins drop down menu at the top of the screen, select Converter –> “HEX -> ASCII”

Hit “CTRL + H” to open the replace dialog box

Search for: http:
Replace with: \r\nwget -c -N -T 20 -t 20 http:
Hit the Replace All button
Hit the Close button (on the replace dialog box)

Hit “CTRL + Home

You should now be left with a bunch of wget lines.

Press “CTRL + A” to select all text
Press “CTRL + C” to call all the text

You should now be able to open a command prompt, change the folder of your choice and right click to paste the whole group of wget commands at once into the command prompt, which will start sequentially downloading the files from HPE or HP Inc, one at a time until all the files have been downloaded.

2016-10-14-07-21-56-snagit-0031

Now you are free to go work on something else (or have a coffee, lunch, beer, nap, etc.) while your files are downloaded.

Once all the files are downloaded, in Explorer enable the Product Name and Product Version columns (in detailed view) to determine what each SP file is.  As an added bonus, the original time stamps of the download files are maintained too.

2016-10-14-07-45-48-snagit-0032

As always – Use any tips, tricks, or scripts I post at your own risk.

Blackberry BES 12 – Device Last Contact Reporting

We use Blackberry’s BES12 to manage all our mobile devices and all our clients’ mobile devices – be it Blackberry, Apple, Android, or even (shudder…) Windows Phone.  Blackberry BES12 is a fairly solid product, but with one major flaw that Blackberry still hasn’t fixed to my satisfaction.  Occasionally (well – more than occasionally), devices just plain old stop checking in and calling home to the BES. When this happens, the devices become unmanageable. At this point we usually need to contact the end user to have them manually open the BES12 client on their device, which will try to call home and reestablish connectivity.

Newer versions of Blackberry BES12 make it easy to show the last device contact time in the Advanced User view if you go in and turn it on in the GUI.  But unfortunately, BES12 doesn’t provide any way that I know of to get a scheduled report by email with these details. So this means we need to manually go log into customers’ BES servers on a regular basis to see if any devices have lost connectivity. This is a huge time sink and a pain in the rear for our help desk that we could probably do without.

So after some poking through the BES 12.5.1 database tables, I came up with a query that will give me the information I am looking for.  All that was left after this was to create a PowerShell wrapper to automatically run the script and email me the report on a daily basis (of which there is a picture below).

2016.08.30 - 09.39.16 - SNAGIT -  0013

Notes:

SQL Server 2012 Express or newer is required for PowerShell integration I believe. I’ve tested this script with SQL Express 2012 SP3. You can check for PowerShell integration support by using these two PowerShell commands:   Import-Module “SQLPS”   and   “Invoke-Sqlcmd”

I wrote the SQL query based on the SQL tables in BES 12.5.1, but it appears to work against BES 12.3.1 too.

Code lines 1 and 2 are comments I like to add to my scripts to allow me a quick way to copy, paste, and setup my script from Outlook onto the target machine(s) so everyone is setup the same way. Code line 2 will set the script to run at 12:15 am daily under the System security context. Adjust as you see fit.

Code lines 10, 11 and 26 are variables that need to be changed and adjusted for customer environments as required.

Code line 10 – $emailTo is who the email needs sent to (i.e. besadmin@jbgeek.net)
Code line 11 – $smtpServer is the SMTP server you are going to send through (i.e. mail.jbgeek.net)
Code line 26 – BES12 is the name of your production BES12 SQL database

By default, if you don’t change anything, $emailTo and $smtpServer will auto-populate using the $DnsDomain variable, just like $emailFrom, which should end up as the server’s NetBios computername @ the server’s DNS name (i.e. JBGEEK-BES01@JBGEEK.NET).

As always – Use any tips, tricks, or scripts I post at your own risk.
###  begin cut & paste of start notepad++ c:\windows\BES_Connectivity_Report.ps1
###  cmd.exe /c schtasks /create /tn "Daily BES Connectivity Report" /tr "\"C:\Windows\System32\WindowsPowerShell\v1.0\powershell.exe\" -ExecutionPolicy RemoteSigned -noprofile -File C:\Windows\BES_Connectivity_Report.ps1" /sc daily /st 00:15:00 /ru "System"
###  Dean Colpitts / blog.jbgeek.net / 2016.08.30

Import-Module 'SQLPS' -DisableNameChecking;

$DnsDomain = Get-WmiObject -Class Win32_NTDomain -Filter "DSDirectoryServiceFlag='True'" | Select -ExpandProperty DnsForestName
$ThisComputerName = Get-WmiObject -Class Win32_ComputerSystem | Select -ExpandProperty Name
$emailFrom = "$($ThisComputerName.ToUpper())@$($DnsDomain.ToUpper())"
$emailTo = "besadmin@$DnsDomain"
$smtpServer = "mail.$DnsDomain"
$messageSubject = "$ThisComputerName.$DnsDomain BES Connectivity Report"
$message = New-Object System.Net.Mail.MailMessage $emailfrom, $emailto
$message.Subject = $messageSubject
$message.IsBodyHTML = $true

$style = @'
<style type="text/css">
  table {text-align: left; font-family: arial, font-size: 12px; padding: 5px 5px; border: 1px solid #000000; border-collapse: collapse;padding-right: 10px; padding-left: 10px;}
  th {text-align: left; font-family: arial, font-size: 12px; padding: 5px 5px; color: #000; column-width: 100px; border-top: 1px solid #000000; border-bottom: 1px solid #000000;background-color: #6495ED;padding-right: 10px; padding-left: 10px;}
  td {font-family: arial, font-size: 12px; padding: 5px 5px; color: #000; column-width: 100px; border-top: 1px solid #000000; border-bottom: 1px solid #000000;padding-right: 10px; padding-left: 10px;}
</style>
'@

$sqlquery = @"
Use BES12
Select Top 1000000
  obj_user.display_name As [User],
  def_device_os_family.company_name as [Manufacturer],
  def_device_hardware.model as [Model],
  def_device_os.name as [OS Version],
  obj_device.normalized_phone_number as [Phone Number],
  Convert(Varchar(10), obj_user_device.last_communication, 102) As [Last Contact]
From obj_user
  Inner Join obj_user_device On obj_user_device.id_user = obj_user.id_user
  Inner Join obj_device On obj_device.id_device = obj_user_device.id_device
  Inner Join def_device_hardware on def_device_hardware.id_device_hardware = obj_device.id_device_hardware
  Inner Join def_device_os on def_device_os.id_device_os = obj_device.id_device_os
  Inner Join def_device_os_family on def_device_os_family.id_device_os_family = def_device_os.id_device_os_family
Order by [User]
"@

$message.Body = Invoke-Sqlcmd -Query $sqlquery -ServerInstance '.' |  Select * -ExcludeProperty RowError, RowState, Table, ItemArray, HasErrors | sort-object "Last Contact" | convertto-html -Head $style
$smtp = New-Object Net.Mail.SmtpClient($smtpServer)
$smtp.Send($message)

HOWTO: Replace a failed 3Par drive

HPE 3Pars are great arrays, but just like any other storage system, they do occasionally end up suffering a failed hard drive.  Replacing a failed 3Par drive isn’t quite the same as replacing a failed Proliant Smart Array controller drive – there are a few manual steps that need done to facilitate the replacement process, which I am going to detail below (note – I’m using a StoreServ 7200, based on OS 3.2.1 MU2 as my reference in this post).

First, SSH (via Putty) the 3PAR’s management IP and login as 3paradm (remember the username and password are case-sensitive).

At the 3PAR_SN# cli% prompt, type:    showpd -failed -degraded

This should show you the failed drive and it’s ID (in the example below, the drive hasn’t totally failed, but rather is just degraded due to an internal loop error in the drive, so it needs replaced).

2016.05.24 - 09.15.46 - SNAGIT -  0026

Next, see if servicemag has been issued or is running with:   servicemag status

If servicemag is not running, you will see:   No servicemag operations logged.

Now we want to see if the data has been evacuated off the drive already by running this command:   showpd -space 15   (where 15 is the drive ID that needs replaced).   Using the output shown below, double check there is no data left on the drive. You need to check that all columns other than size and failed are zero.  As you can see from the example , this drive still has data on it (again because the drive in this example is only degraded, not failed – my experience is that typically failed drives have 0, 0, 0, 0 for volume, spare, free, and unavailable, while failed is usually equal to the size).

2016.05.24 - 09.15.54 - SNAGIT -  0027

To evacuate the data, run this command:    servicemag start -pdid 15     and answer yes when prompted if you are sure you want to run it.

2016.05.24 - 09.56.05 - SNAGIT -  0033

To check the status / progress of the servicemag command, run:    servicemag status

2016.05.24 - 09.16.14 - SNAGIT -  0029

As you can see above, 4 chunklets (1GB blocks of disk space) have been moved off the drive so far, with another 107 chunklets (107 GB) to evacuate.  Below is what you will see once the servicemag process has finished.

2016.05.24 - 09.16.23 - SNAGIT -  0030

Before continuing, verify there is no data left on the drive by running:  showpd -space 15

2016.05.24 - 09.16.28 - SNAGIT -  0031

When the HPE field engineer arrives onsite with the replacement disk, you may need to turn on the locate light on the failed drive for him.  To do this, run:      locatecage -t XX cageY ZZ    where TT is time in seconds (i.e. 300), and Y in cageY is the cage number shown above, and ZZ is the magazine number to locate (i.e.  locatecage -t 300 cage0 15 enables the flashing locate light for 5 minutes for the failed drive that is being referenced in this HOWTO).

Once the drive has been replaced, the 3Par **should in the background** run an admitpd automatically for you.  To verify this, run:   showpd -p -mg ZZ -c Y     to see if the new drive is listed (note it will most likely have different drive ID than the dead drive)

When you have verified the new drive has been seen and admitted, you can check the rebuild status with servicemag statusYou can see below the rebuild process, followed by the status message once servicemag as successfully finished.

2016.05.24 - 09.16.52 - SNAGIT -  0032

If you go back to the HP 3PAR Management Console and refresh the console, you should find the fail drive no longer appears (it will stay there appearing as failed even after it has been removed from the cage until the rebuild process is completed, at which point it will go away).

If the HP 3PAR Management Console indicates a firmware update needs performed on the replacement drive, run:   upgradepd ZZ    and answer yes when prompted.  Refresh the HP 3PAR Management Console when the upgrade is complete to check for any other errors.

If no further errors appear, the drive replacement process is completed.  If there are errors, then escalate back to HPE with your original case number.

As always – Use any tips, tricks, or scripts I post at your own risk.

HOWTO: Configure FileZilla Server to use SSL/TLS with a wilcard SSL certificate

Every so often, we have the need to securely transfer large files between very remote systems, and the simplest way to do this is via FTP with the FileZilla client.  Of course the FTP protocol by itself isn’t secure, but if you enable FTPES, it generally is.  FTPES however requires a SSL certificate, and while you could allow the FileZilla server to generate it’s own self signed certificate, we like to use our existing wildcard SSL certificate which requires a few extra steps, as detailed below.

  1. Download the current version of FileZilla Server.
  2. Perform a Standard install accepting all defaults.
  3. Copy the domain’s wildcard certificate in PEM format (i.e. wildcard.jbgeek.net.pem) and the wildcard’s key file (i.e. wildcard.jbgeek.net.key) to “C:\Program Files (x86)\FileZilla Server”.      (see HOWTO: Generate and self-sign Wildcard SSL certs in Ubuntu if you need to convert your existing PFX wildcard certificate to PEM format).
  4. Open Settings in the FileZilla Server management interface and navigate to SSL/TLS settings.
  5. Select “Enable FTP of SSL/TLS support”.
  6. Browse and select the key file you copied above for the Private Key file.
  7. Browse and select the PEM file you copied above for the Certificate file.
  8. Select “Force PROT P to encrypt file transfers in SSL/TLS mode”.
  9. Adjust any other options as required (i.e. password protecting the management interface until “Admin Interface Settings” or enabling MODE Z support under File Transfer compression).
  10. Select Users from the Edit drop down menu and create your users and access rights as required.
  11. Stop and restart the FileZilla Server service.
  12. Open the FileZilla FTP Client, and connect to via FTPES to the FQDN of the FileZilla Server  (i.e. ftpes://myftpesserver.jbgeek.net, along with the username and password combination you just created).
  13. If you configured SSL/TLS correctly using the above steps, the FileZilla FTP Client should prompt you if you wish to trust this certificate – select “Always trust certificate for future sessions” and click ok.

Keep in mind you may need to adjust the ports on your firewalls to allow connectivity, which is outside the scope of this post.

As always – Use any tips, tricks, or scripts I post at your own risk.

HOWTO: Turn on a HDD UID on a HPE Proliant in VMware with HPSSACLI

This morning we needed to replace a hard drive in a HPE Proliant running VMware ESXi at a remote site that had a PFA on it.  Unfortunately, while ILO is great at identifying the defective drive, it has no ability to enable the UID on the drive, and given that this unit is at a remote site, we had no way of knowing in advanced if the fault light was actually turn on for this drive before the HPE field engineering arrived to swap the drive.  So after digging through the help documentation, I found the necessary HPSSACLI command to enable the drive’s UID.

First, to get a list of all the physical drives in an ESXi host, SSH the host and run this command:

/opt/hp/hpssacli/bin/hpssacli ctrl slot=0 physicaldrive all show

This should output a list of all the drives in the system as shown below.

2016.05.19 - 10.14.13 - SNAGIT -  0005

Next, to enable the blue UID LED for 1 hour on port 2I, box 1, bay 2, run this command:

/opt/hp/hpssacli/bin/hpssacli ctrl slot=0 physicaldrive 2I:1:8 modify led=on duration=3600

The blue UID should now come on for 1 hour and then shut off on it’s own.  If you want want to manually shut if off before the 1 hour is up, run the same command again, but change the “led=on” to “led=off”.

As always – Use any tips, tricks, or scripts I post at your own risk.

Upgrade a stuck ILO firmware via SSH

We have had a rash of issues where by upgrading ILO firmware via the WebUI has been failing.  It looks like it finishes, but when you log back in, it is still the original firmware from when you started the upgraded.  And no matter what you do via the WebUI, it just will not upgrade.  So to upgrade the stubborn firmware, the simplest thing to do is SSH the ILO directly and upload the firmware via the console interface.  Below are the steps to do this.

First, you need a running web server to pull the firmware from.  IIS is usually the handiest, so it is simply a matter of adding a mime-type for the binary firmware file.  Open an administrative command prompt and run:

c:\windows\system32\inetsrv\appcmd.exe set config /section:staticContent /+"[fileExtension='.bin',mimeType='application/x-bin']"
iisreset /restart

Extract the ILO firmware bin with 7-Zip and put the bin somewhere within IIS that you can download it.   Next – to save myself extra grief, I also make sure I can actually download the firmware to a regular PC with a browser before continuing.  So open the browser of your choice and make sure you can download the bin to your PC before continuing.

Putty the ILO interface, accepting the SSH key (if prompted), and login.  Once logged in, check, then download the new firmware with the following commands.

*** Note – the ILO will automatically reboot once it successfully downloads the firmware and does not give any indication of the reboot.  As a result, you might want to start a continuous ping to the ILO to see once it has rebooted and is back up ***

show /map1/firmware1
cd /map1/firmware1
load -source http://http_server_ip/ilox_xxx.bin

Once the ILO reboots, you should have a working ILO with the firmware version you want / need.

As always – Use any tips, tricks, or scripts I post at your own risk.

2016.05.12 - 19.34.52 - SNAGIT -  0097

Factory Reset a HPE FlexFabric 5700 to defaults

Not to long ago, we received a new HPE FlexFabric 5700 switch and we proceeded to muck around with the configuration settings trying a few things that we normally would never do to a production switch.  When we were done having fun and learning, we needed to reset the unit back to defaults so we could really deploy it into production.  Of course, resetting a switch to factory defaults is not something you do very often, so we had to actually RTFM.  I’ll save you the time of that here…

From the serial console, execute these commands:

restore factory-default
yes
save
yes
{hit enter}
reboot

When the switch reboots, it will be at defaults.

Below is a screen snapshot of what you’ll see during this process.

2016.05.11 - 14.43.21 - SNAGIT -  0066