HOWTO: Mass deleting orphaned @HPE #StoreOnce Catalyst items via cli

Recently, I had a customer go through a merger, and they inherited another StoreOnce located at a remote site.  We made the decision to enable Catalyst copy from the customer’s existing StoreOnce to the inherited StoreOnce to enhance the customers backup and recovery strategy.  The only issue was the size of the existing StoreOnce Catalyst store was larger than the available capacity on the inherited StoreOnce, which already had the capacity expansion licensed and installed.

Upon further investigation I discovered that the customer’s Catalyst store had several thousand orphaned Veeam backups from over the years that were no longer present in the VBR database, nor where they picked up by Veeam when rescanning the repository.  Deleting these orphaned Veeam files would easily free up enough space in the source Catalyst store to match what was available in the in inherited StoreOnce.  All I needed to do was delete these orphaned files!

This however was much easier to say than to do.  Because Veeam wasn’t detecting them, I couldn’t use the VBR interface to just select them and delete them from disk.  The StoreOnce 4.x WebUI includes the option to list the items in the Catalyst store, and delete them.  Unfortunately, it only allows you to select one item at a time, then click delete, and then click through an “are you sure” warning.  All told, it probably takes about 8 to 11 seconds per item to delete it, then you need to navigate through the items list again to find the next aged item and repeat this process.  This is fine if you only have a handful of items you need to delete.  I had somewhere beyond 5800 items to cleanup!

I recalled that HPE offers a tool called “HPE StoreOnce Catalyst Copy Utility”.  It is specifically designed to be used to copy backup items to alternate StoreOnce appliances for safekeeping, delete backups that are obsolete or orphaned, and synchronize backup copies between a primary backup target and a disaster recovery site.  It can be downloaded from the HPE Software Center (https://myenterpriselicense.hpe.com). What I found out though is the documentation with regards creating the credential file is a bit sparse, so I’m going to take the time explain how to actually use the tool here.

And as always before I begin:

Use any tips, tricks, or scripts I post at your own risk.

Once you have downloaded the tool from the HPE Software Center, run the installer and accept all the defaults.  If you are on a Windows machine, this means it’s going to install to C:\Program Files\HPE\StoreOnce\isvsupport\HPE-Catalyst-CATTOOLS

The HPE StoreOnce Catalyst Copy Utility is strictly a console based app – there is no GUI at all.  To get started, open an Administrative Command Prompt and navigate to C:\Program Files\HPE\StoreOnce\isvsupport\HPE-Catalyst-CATTOOLS\bin

The first thing you need to do is create an encrypted password file for your Catalyst store.  To do this, you run:

StoreOnceCatalystCredentials.exe  –add -u UserName –s StoreOnce_IP –o pass.txt

Note – the UserName is the username with permissions to the Catalyst Store, which may or may not be the same as the Admin password to the StoreOnce (in fact, from a security perspective, it should be totally different!). If you copy and pasted these command lines, take note that your browser may replace the double dash with a single dash causing the commands to fail.

(You’ll also note that some of my screenshots are blurred and some are not… I got side tracked in the middle of writing this and became lazy since there really isn’t anything here that is secret anyways).

Now that we have our password, lets make sure can connect to the Catalyst Store.  To do this, run:

StoreOnceCatalystCopy.exe –list –origin “StoreOnce IP” –origin-store “CATALYST_STORE_NAME” –username “USERNAME” –password-file pass.txt

You should get a summary back similar to below that shows the current Catalyst Copy Jobs status.

Back in the WebUI, I’ve filtered by “create date” to find those really old orphaned backups.  In my example here, I’m going to remove all the files created prior to May 24 (which is 5 files in this example – and will also break the Veeam backup chain for a couple of them – just something to keep in mind!)

To delete these files with HPE StoreOnce Catalyst Copy Utility, the syntax is:

StoreOnceCatalystCopy.exe –delete-items –filtercreateddaterange [dd/mm/yyyy-hr:mm:ss]:[dd/mm/yyyy-hr:mm:ss] –origin “StoreOnce_IP” –origin-store “CATALYST_STORE_NAME” –username “USERNAME” –password-file pass.txt –force

So in my case I’m going to delete everything created between January 1, 2018 and May 24, 2020, so it would be:

StoreOnceCatalystCopy.exe –delete-items –filtercreateddaterange [01/01/2018-00:00:00]:[24/05/2020-00:00:00] –origin “192.168.99.29” –origin-store “VEEAM01” –username “dcc” –password-file pass.txt –force

As you can see, the HPE StoreOnce Catalyst Copy Utility has removed the 5 files older than May 24, 2020.  It took only a few seconds in total. 

And these deletions are now reflected in the WebUI once I refresh it.

For a full list of the options, advanced filters, and settings related to the HPE StoreOnce Catalyst Copy Utility, be sure to download the user guide from the same page you downloaded the utility from at the HPE Software Center.

And the 5800+ items I had to purge? It was around 294 TiB of capacity and it took a little under 2 hours to complete with this method. The StoreOnce Housekeeping Space Reclamation process is working away at reclaiming all that capacity now.

Updating the firmware of a list of HPE ILO 5 IPs via PowerShell

In addition to my previous blog post of upgrading a list of ILO 4’s firmware via PowerShell, I also wrote a similar script for ILO 5. However this script makes use of the iLO Repository and the .fwpkg file type, and does not rely on an IIS server for the ILO to pull the firmware file from. Other than that, it functions very similar to the ILO 4 update script I previously posted.

Below is my PowerShell code.  You’ll need to adjust it as required for your own environment.  Be sure to update the items in red where required.

And as always:
Use any tips, tricks, or scripts I post at your own risk.

### get ILORest here - https://downloads.hpe.com/pub/softlib2/software1/pubsw-windows/p1440367746/v177187/ilorest-3.0.1.0-8.x86_64.msi

Import-Module BitsTransfer
$url_zip = "https://downloads.hpe.com/pub/softlib2/software1/fwpkg-ilo/p991377599/v167897/ilo5_230.fwpkg"
$output_path = "C:\TEMP\ILO5"
$output_zip = $output_path + '\ilo5_230.fwpkg'
New-Item -Path $output_path -ItemType "Directory" -Force -Confirm:$false | out-null
Start-BitsTransfer -Source $url_zip -Destination $output_zip

$username = "ilo-username"
$password = "ilo-password"
$ILOrest = "C:\Program Files\Hewlett Packard Enterprise\RESTful Interface Tool\ilorest.exe"
$ILOlist = "$output_path\ilolist.csv"
'iloip' | Out-File $ILOlist
'192.168.11.230' | Out-File $ILOlist -Append

Import-Csv $ILOlist | Foreach {
$iloip = $_.iloip
$args = " flashfwpkg C:\DL\ILO5\ilo5_230.fwpkg --url " + $iloip + " -u " + $username + " -p " + $password
Start-Process -Wait -Filepath $ILOrest -ArgumentList $args
}

Updating the firmware of a list of HPE ILO 4 IPs via PowerShell

Recently, I had to update a bunch of HPE ILO 4s at multiple locations. Most of my managed sites have between 3 and 9 ILOs that need updated when HPE pushes out an ILO firmware update. I could have used ILO federation group firmware update, or the ILO Amplifier Pack to do this, but I’m a fan of scripting things so I just have to RDP a server onsite, open a prompt and paste a few lines of code and let it start doing it’s thing, then RDP the next site and do the same thing. So I built a PowerShell script to download the ILO 4 update, extract the .bin file, copy it an IIS server, and then proceed to upgrade each ILO one a time utilizing the ILO RestAPI.

Below is my PowerShell code.  You’ll need to adjust it as required for your own environment.  Be sure to update the items in red where required.  Keep in mind your IIS server ($iisip) will need to have a mime type associated with bin files for this to work.

And as always:

Use any tips, tricks, or scripts I post at your own risk.


### get ILORest here if you need it - https://downloads.hpe.com/pub/softlib2/software1/pubsw-windows/p1440367746/v177187/ilorest-3.0.1.0-8.x86_64.msi

Import-Module BitsTransfer
$url_zip = "https://downloads.hpe.com/pub/softlib2/software1/sc-windows-fw-ilo/p1012384589/v186433/cp045313.exe"
$binname = "ilo4_275.bin"
$output_path = "C:\TEMP\ILO4"
$output_zip = $output_path + '\cp045313.exe'
$binpath = $output_path + "\" + $binname
$iisip = "192.168.11.4"
$iispath = "\\" + $iisip + "\c$\inetpub\wwwroot\" + $binname
New-Item -Path $output_path -ItemType "Directory" -Force -Confirm:$false | out-null
Start-BitsTransfer -Source $url_zip -Destination $output_zip
$7zpath = "C:\Program Files\7-Zip\7z.exe"
$7options = "e "+ $output_zip + " " + "-o" + $output_path + " *.bin"
Start-Process -Wait -Filepath $7zpath -ArgumentList $7options
Copy-item -path $binpath -destination $iispath -force -confirm:$false

$username = "ilo-username"
$password = "ilo-password"
$ILOrest = "C:\Program Files\Hewlett Packard Enterprise\RESTful Interface Tool\ilorest.exe"
$ILOlist = "$output_path\ilolist.csv"
'iloip' | Out-File $ILOlist
'192.168.11.230' | Out-File $ILOlist -Append
'192.168.11.231' | Out-File $ILOlist -Append

Import-Csv $ILOlist | Foreach {
$iloip = $_.iloip $args = " firmwareupdate http://" + $iisip + "/" + $binname + " --url " + $iloip + " -u " + $username + " -p " + $password Start-Process -Wait -Filepath $ILOrest -ArgumentList $args }


HOWTO: HTTP boot the HPE Proliant Service Pack ISO DVD using RESTfulAPI to update firmware without messing with WDS or PXE

Most of my customer sites consist of one to four HPE Proliant DL3xx servers running VMware ESXi and an additional HPE Proliant DL3xx running Windows 2012 R2 / 2016. HPE offers some great tools for managing their servers, but unfortunately for smaller organizations, most of HPE’s management tools (and I’m looking squarely at you Insight Control and OneView) take more time to setup and get running correctly then the time you’ll save by installing / updating a small handful of servers manually.  Therefore, I usually don’t deploy these tools to help install OSes or update firmware at my smaller client sites.  I generally just rely on booting the HPE Support Pack for Proliant (SPP) to update firmware, use a USB key with a scripted ESXi install on it for installing ESXi, and utilize WDS to install Windows directly on my Proliants when required.

Prior to HPE Proliant Gen 9 servers, I would PXE boot the Proliant Service Pack using PXELINUX and mount the ISO via NFS.  Then along came Gen 9 with UEFI.  Unfortunately, PXELINUX suffers from a complete lack of support for UEFI.  A couple of times I pestered some of the HPE SPP developers and managers in person while at HPE’s campus in Houston, but they never really showed much interest in explaining or documenting how to get network booting working with the SPP when the server utilized UEFI, so I had pretty much given up on ever getting it to work.

The other day I was playing with the HPE RESTful Interface Tool and decided to try configuring HTTP boot on DL380 Gen10 with the current SPP ISO image (P11740_001_spp-2018.11.0-SPP2018110.2018_1114.38.iso).  Much to my surprise, after modifying only a single configuration file on the ISO image, I was able to successfully boot the current SPP ISO image via HTTP and run a full firmware update on the Gen10 I was playing with.

The nice thing about this method is that because it is all done via HTTP, you don’t have to mess with or disable your WDS (Windows Deployment Services) server to add Linux support (which is what the SPP ISO is based on).  So this is great news for pure Windows shops!  And as a bonus, these steps works with Gen 9 servers too.

So how did I do it?  Before I share that, as always:

Use any tips, tricks, or scripts I post at your own risk.

First, you need to slightly modify the SPP ISO image.  Copy the original SPP ISO image to your web server (i.e. c:\inetpub\wwwroot).

Open the ISO image with your favorite ISO editor and extract \efi\boot\grub.cfg, then open the grub.cfg with a decent text editor (i.e. Notepad++, but definitely not the built-in Windows Notepad).  Scroll down the first menuentry, which will be “Automatic Firmware Update”.  Then copy and paste the following just above that menuentry:

menuentry "HTTP Firmware Update Version 2018.11.0" {
set gfxpayload=keep
echo "Loading kernel..."
linux /pxe/spp2018110/vmlinuz media=net root=/dev/ram0 ramdisk_size=10485760 init=/bin/init  iso1=http://xxx.xxx.xxx.xxx/spp.iso iso1mnt=/mnt/bootdevice hp_fibre cdcache TYPE=MANUAL AUTOPOWEROFFONSUCCESS=no modprobe.blacklist=aacraid,mpt3sas  ${linuxconsole}
echo "Loading initial ramdisk..."
initrd /pxe/spp2018110/initrd.img
}

So your grub.cfg will look like this when you are done:

2018.12.20 - 17.45.17 - SNAGIT - 0027

Adjust the http address (xxx.xxx.xxx.xxx), path, and ISO image name as required for your network, then save the updated grub.cfg and inject it back into the ISO image, over-writing the existing \efi\boot\grub.cfg, and then save the updated ISO image.

Be sure to add the .ISO mime type to your web server so that the ISO file type can be handled correctly.  The command below will work with IIS 8.5 and above to add a new mime type to IIS for .ISO.

C:\Windows\System32\inetsrv\appcmd.exe set config -section:system.webServer/staticContent /+"[fileExtension='iso',mimeType='application/iso']"

Now, you need to install the HPE RESTful Interface Tool on your machine.  The current version at the time of this writing is 2.3.4.0.  Go to the Hewlett Packard Enterprise Support Center and search for “RESTful Interface Tool for Windows”, then download and install the .msi (there is a Linux version available as well there).

Once the HPE RESTful Interface Tool is installed, run it as an Administrator.  Next, you need to connect to your server’s ILO, select the Bios object, set the UrlBootfile Entry and commit the changes.

*** NOTE: Make sure the UrlBootFile entry matches the url of your ISO image that your put on your webserver and specified as the iso1 switch in the grub.cfg entry.

ilorest
login ilo_ip_address -u admin -p password
select Bios.v1_0.0
set UrlBootFile=http://xxx.xxx.xxx.xxx/spp.iso
commit

2018.12.19 - 13.56.41 - SNAGIT - 0003

This takes care of the changes you must make to your Proliant server (keep in mind each server that you want to HTTP boot needs to have this this done).

The next time your server boots, the UrlBootFile change will be applied at the end of POST, then server will automatically reboot and start to POST again.

2018.12.19 - 14.18.08 - SNAGIT - 0005

That’s it – your configuration is all done.  Now when you reboot your server, if you hit F11 for the Boot Menu, you’ll have an entry for HTTP there – select it.

2018.12.19 - 14.20.01 - SNAGIT - 0006

After maybe 30 to 45 seconds (depending on your network speed – I’m using 10GbE), you’ll see the familiar SPP boot menu, but with an extra entry which is set as the default entry.

2018.12.19 - 14.21.25 - SNAGIT - 0009

Select it, and after about a minute (again – I’m using 10GbE) you’ll see the ISO image get mounted.

2018-12-20_17-54-25

If the image fails to mount, verify you are able to download the image you specified as the UrlBootFile from your PC.  If that works, then verify that the grub.cfg is correctly updated, with no typos.  Also – verify your server has 16GB+ of RAM in it, as the grub entry creates a 10GB RAM disk.  You may also need to upgrade the ILO firmware and drivers to current builds (such as 2.61 for ILO4 or 1.39 for ILO5) before using the iLOrest tool.

If you so desire, you could also set the new grub entry to be totally automatic by grabbing the proper switches out of the “Automatic Firmware Update” entry.  I suspect it may also be possible to split the ISO and boot one ISO without the packages folder (so it boots quicker) and mount a second the ISO with the packages folders still there to run the upgrades from.  Just to be clear, I haven’t tested that yet – it’s just a theory at this point.

I have tested this by HTTP booting over a branch office VPN tunnel which tops out at 100Mbps – it took a while for the image to load (I didn’t time it as I was working on other things at the time), but it did eventually load and it successfully updated the remote server.

When the next Support Pack for Proliant is released, all you need to do is update the grub.cfg with the correct paths and copy the updated ISO to your webserver with the same file name you used here.  You shouldn’t need to adjust the UrlBootFile on your servers.

Happy updating!


HOWTO: Set the creation and modification timestamp on a file via #PowerShell

Recently, I updated one of our internal tool kits, and then packaged it for distribution.  It was a busy day when I updated it, so I didn’t manage to package it on the same day as I had updated / built / compiled it.  Internally, we use the date as the version number of the tool (occasionally suffixed with a letter which indicates my screw-ups in the build process on that given day).  In this particular case, the version number was 2018-11-24b, indicating I updated it on 2018-11-24, and that this was the 3 revision (no suffix, a, then b) that I had created on 2018-11-24 (I found bugs in the first two after testing the packaging).

Because I wasn’t packaging on the same day as I updated it, the time stamps on my archives didn’t match the build date, so I need to change them – all of them!  So I figured up PowerShell and used it instead.  Below are the commands necessary to view and set both the creation and modification timestamps on a file via an elevated PowerShell prompt.

As always – Use any tips, tricks, or scripts I post at your own risk.

To view the file creation timestamp:

(Get-ChildItem “c:\path\file_to_change.wim”).CreationTime

To set the file creation timestamp:

(Get-ChildItem “c:\path\file_to_change.wim”).CreationTime = ’11/24/2018 11:24AM’

To view the file modification timestamp:

(Get-ChildItem “c:\path\file_to_change.wim”).LastWriteTime

To set the file modification timestamp:

(Get-ChildItem “c:\path\file_to_change.wim”).LastWriteTime = ’11/24/2018 11:24AM’

To set the creation and modification timestamp on every single file in a folder:

foreach ($objFile in Get-ChildItem “c:\path\*”) {$objFile.Creationtime = ’11/24/2018 11:24AM’}

foreach ($objFile in Get-ChildItem “c:\path\*”) {$objFile.LastWriteTime = ’11/24/2018 11:24AM’}


HOWTO: #PowerShell script to download, extract and add #SysinternalsSuite to the path

I absolutely love Microsoft’s Sysinternals Suite – it’s an amazing set of tools for troubleshooting and tweaking Windows machines.  Heck – there isn’t a day goes by that I don’t use at least one of the tools out of the suite.  I generally try to download, extract and add the suite to the path of any computer I touch.

This morning while building a new 2016 template for a customer, I realized I had missed downloading and adding it to the path, but the VM was in a firewalled VLAN and unable to reach my staging and support server – so I couldn’t just grab the extracted directory from my staging server.  This got me to thinking there must be a simple way to use a cli or script to download, extract, and add the extracted folder to the computer’s path.  So I took 30 minutes and wrote one.

Basically, this script can be cut and pasted into an elevated PowerShell session, and it will grab the most recent SysinternalsSuite.zip from Microsoft, extract the .zip to C:\Program Files\SysinternalsSuite, and then add C:\Program Files\SysinternalsSuite to the computer’s path if it does not already exist in the path.

I’ve tested this with Windows 7, Windows 10 (1803), Windows Server 2012 R2 and Windows Server 2016.

As always – Use any tips, tricks, or scripts I post at your own risk.

Import-Module BitsTransfer
$url_zip = "https://download.sysinternals.com/files/SysinternalsSuite.zip"
$output_path = "C:\Program Files\SysinternalsSuite"
$output_zip = $output_path + '\SysinternalsSuite.zip'
Remove-Item -Path $output_path\*.* -force -confirm:$false
New-Item -Path $output_path -ItemType "Directory" -Force -Confirm:$false | out-null
Start-BitsTransfer -Source $url_zip -Destination $output_zip
Add-Type -AssemblyName System.IO.Compression.FileSystem
function Unzip
{
param([string]$zipfile, [string]$outpath)
[System.IO.Compression.ZipFile]::ExtractToDirectory($zipfile, $outpath)
}
Unzip $output_zip $output_path
Remove-Item -Path $output_zip -force -confirm:$false
$oldpath = (Get-ItemProperty -Path "Registry::HKEY_LOCAL_MACHINE\System\CurrentControlSet\Control\Session Manager\Environment" -Name PATH).path
If ($oldpath -NotLike "*SysinternalsSuite*") {
$newpath = "$oldpath;$output_path"
Set-ItemProperty -Path "Registry::HKEY_LOCAL_MACHINE\System\CurrentControlSet\Control\Session Manager\Environment" -Name PATH -Value $newPath
}
$writtenpath = (Get-ItemProperty -Path "Registry::HKEY_LOCAL_MACHINE\System\CurrentControlSet\Control\Session Manager\Environment" -Name PATH).path
write-host $writtenpath


HOWTO: Manually uninstall Citrix StoreFront after a 1603 MSI Installer error during an upgrade or uninstall (#Citrix #StoreFront #msiexec)

Many of my clients utilize Citrix XenDesktop or XenApp and thus Citrix StoreFront.  Once it is initially configured and running, things are generally pretty smooth going.  But when it comes time to perform in-place upgrades of Citrix StoreFront, sometimes things get a bit hairy and go off track, usually ending up with a dreaded 1603 MSI installer error.  Then you are royally screwed because the StoreFront installation is half installed (or half uninstalled if you are an optimist) and you can’t repair, reinstall, or even uninstall using normal methods.  Below are the notes I’ve developed for myself and my support team to manually uninstall StoreFront should the need arise – which it does, often.

2017-02-21-19-14-07-snagit-0020

These notes are based on single server stand alone installs of Citrix StoreFront versions 2.6.0.5031, 3.0.1.55 , and 3.6.0.33 (as in I’ve used these notes to manually uninstall those versions before).  I have used these notes on XenApp 6.5 servers and on XenDesktop 7.x controllers without any issues.  Your mileage may vary though.

As always – Use any tips, tricks, or scripts I post at your own risk.

**Warning** Reboot and take a VM snapshot of the StoreFront server before doing anything else.  A reboot is a requirement before doing anything with StoreFront, it doesn’t matter if you are doing an install / upgrade, or are already screwed and need to manually uninstall – reboot before continuing!!!  And if you do not reboot – YOU WILL GET ERRORS that will prevent the instructions below from working.

Immediately after you have rebooted, open an elevated Command Prompt and remove all thumbs.db files on the StoreFront server which can be locked opened by Windows Explorer and cause the uninstaller to fail:

c:
cd \
del /s thumbs.db

2017-02-21-19-24-22-snagit-0022

Next, verify that the HTML5 Client is actually installed on the machine, otherwise the uninstaller will likely fail later on.

msiexec /i "C:\Program Files\Citrix\Receiver StoreFront\Features\HTML5Client\template\HTML5Installer.msi"

If you get a repair / remove Windows Installer dialog box, then it is installed and you can just exit the installer, otherwise install using the default settings.

Open the StoreFront MMC, and if it allows you (which it likely won’t), delete all your stores.

Open Add/Remove Programs and uninstall the Citrix Receiver if it is installed.

Open an elevated Powershell console.  Add the Delivery Services Framework snapin,  remove all the Feature Instances, then confirm they are all removed.

**Note – only add the single snapin listed below, otherwise you potentially will end up with files locked open during the removal process, which can cause the removal to fail**

### Add the Citrix Delivery Services Framework Powershell Snapin
add-pssnapin Citrix.DeliveryServices.Framework.Commands

### Remove all DS FeatureInstances
Remove-DSFeatureInstance -all -confirm:$false

### Verify all FeatureInstances are deleted - you should see just {} listed
Get-DSFrameworkController

### If any FeatureInstances are still listed, remove manually them with the next line, otherwise skip to Uninstall-DSFeatureClass
remove-dsfeatureinstance -featureinstanceid feature_name

2017-02-21-19-35-01-snagit-0025

Stop the Storefront services if they are still running before continuing.

Close Powershell

**Note – it is very important you close the PowerShell console at this point and reopen a new one before continuing below and attempting to remove StoreFront’s Feature Classes, otherwise the removal of the Feature Classes will fail**

Open a new elevated Powershell console (see warning above).  Add just the Delivery Services Framework snapin,  remove all the Feature Classes, then confirm they are all removed.

###Add the Citrix Delivery Services Framework Powershell Snapin
add-pssnapin Citrix.DeliveryServices.Framework.Commands

###Remove all FeatureClasses
Uninstall-DSFeatureClass -all -confirm:$false

###Verify all Feature Classes have been removed - you should only see {} listed
Get-DSFrameworkController

2017-02-21-19-39-03-snagit-0026

If there are no DSFeatureClasses are still listed, skip to Citrix.DeliveryServices.UninstallUtil.exe below.  Otherwise, some extra manual cleanup is going to be required.  Using your favorite text editor (Notepad++ in my case), open the Framework.xml file (I usually just run the following from an elevated command prompt.

start notepad++ "C:\Program Files\Citrix\Receiver StoreFront\Framework\FrameworkData\Framework.xml"

Within Notepad++, search for the tag “<Type>” to get all the guid’s of any remaining Feature Classes.

Back in the elevated Powershell console, repeatedly run the Uninstall-DSFeatureClass for each <Type> guid you found in the Framework.xml:

Uninstall-DSFeatureClass -Type {guid}

Run the uninstall for each guid one at a time – if you get an error, don’t worry about it, skip it and continue on with the next one.  Once you have gone through all of the guids, run:

Uninstall-DSFeatureClass -all -confirm:$false
Get-DSFrameworkController

Verify all DSFeatureClasses have now been removed.  You may need to repeat the above three steps a few times to completely remove all the DSFeatureClasses due to dependencies within them.

**note – don’t forget to reload/refresh Framework.xml in your text edit of choice if you need to go back and do it again to the list of the remaining DS Feature Classes**

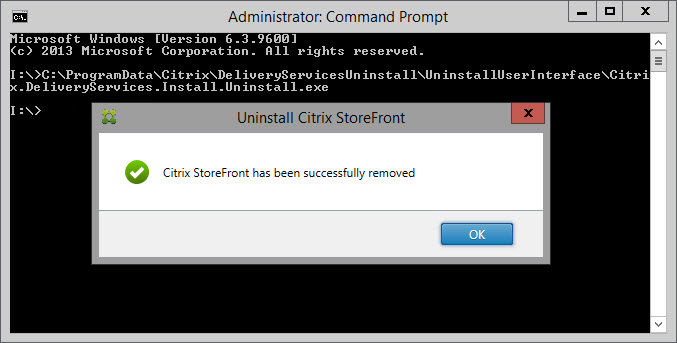
Once all DS Feature Classes have been removed, close PowerShell and open an elevated Command Prompt and run Citrix.DeliveryServices.Install.Uninstall.exe.

C:\ProgramData\Citrix\DeliveryServicesUninstall\UninstallUserInterface\Citrix.DeliveryServices.Install.Uninstall.exe

2017-02-21-19-41-51-snagit-0028

StoreFront should successfully uninstall for you now and disappear from Add/Remove programs.  Reboot the machine from the elevated command prompt:

shutdown /f /r /t 0

After logging back in, open an elevated Command Prompt and cleanup any leftover folders by running:

rd /q /s "C:\ProgramData\Citrix\DeliveryServicesUninstall"
rd /q /s "C:\Program Files\Citrix\Receiver StoreFront"

Don’t worry if you get a “The system cannot find the file specified” error message – that just means the folder has already been removed or doesn’t exist anymore.

Finally, using Windows Explorer navigate to C:\Inetpub\wwwroot and verify the Citrix directory has been removed – if it has not been removed, manually check it’s contents for anything you need to keep and then delete C:\Inetpub\wwwroot\Citrix.

You should now be ready to install a fresh version of StoreFront.

HOWTO: Send “Shift + F10” to a remote #VMware / #vPro console over #RDP

We typically do a lot of our work at client locations over RDP to a server that resides on-prem in the client’s data center.  We then use that on-prem server as a jump server to manage other systems that reside on-prem and for the most part it works well except for the occasion keyboard combo press that just won’t go through to the client machine we are remoted into via the RDP jump server.  This is particularly a problem is when we are deploying Windows images to machines, which we do either via Intel’s vPro KVM controls (if it is physical) or via VMware Console (if it is virtual).  Occasionally the Windows machine will fail to boot during the specialize phase of sysprep, and we need to troubleshoot the issue.

If we were physically sitting in front of the machine, the process would be pretty simple – hit Shift + F10 and a command prompt pops open, and from there you navigate to C:\Windows\Panther and access the sysprep logs using Notepad.  But in our case, because we are utilizing a jump server via RDP to access the console (either vPro or VMware), Shift + F10 is being intercept by the jump server and not passed on to the vPro KVM session or the VMware Console, which means we can’t get to a command prompt to start troubleshooting.  When this happens, we need to disconnect from the RDP session, and use either RealVNC Plus (for the vPro console) or the VMware client directly from our local machines over VPN, which in some cases is deathly slow at best.

After getting stuck the other day having to troubleshoot a sysprep error over VPN using vPro instead of RDP using vPro, I decided there had to be a way to script a hotkey to send Shift + F10 to the console via RDP.  Unfortunately, I didn’t find anything readily available, so I scripted my own using AutoIt, which I then compiled into an .exe and digitally signed with my code signing certificate.

Basically the script searches for a window that has a title of “Intel(r) AMT KVM – VNC Viewer Plus” or a window that has a title that contains ” on ” (as in Windows7 on ESXiHost” and makes the first instance it finds the active window, then sends a Shift + F10 to the window.

Now when I have to send a Shift + F10 to a remote console during troubleshooting, I simply run the correct executable on our RDP jump servers and up comes the command prompt in the remote console!

Below are the two AutoIt scripts and further down are the two compiled .exe files.

As always – Use any tips, tricks, or scripts I post at your own risk.

Code for Intel(r) AMT KVM – VNC Viewer Plus:

$Title = "Intel(r) AMT KVM - VNC Viewer Plus"
WinWait ($Title)
WinActivate ($Title)
Send ("+{F10}")
Sleep (100)
Exit

Code for VMware Console:

Opt("MouseCoordMode", 0)
Opt("WinTitleMatchMode", 2)
$Title = "[REGEXPTITLE:(?i)(.* on .*)]"

WinWait ($Title)
WinActivate ($Title)

MouseClick ( "right",9,88,1 )
Send ("+{F10}")
Sleep (100)
Exit

Already compiled and digitally signed AutoIT executables:

SendShiftF10toVMware
SendShiftF10tovPro

HOWTO: Enable Jumbo Frames in Windows 2012R2 VMs via #PowerShell

Cleaning up my Inbox, I found this nugget that I had sent to myself and I figured I would share… For reasons that now escape me, a few months ago I had the need to enable Jumbo Frames inside of several VMs (ESXi 6.x). Sure, I could have used the mouse and the Network Control panel to do so, but why wear out the ball on my trackball needlessly when I had a ton of HP keyboards laying about that I could abuse instead… So, off to PowerShell!

Basically, open an Administrative PowerShell and run one of these three sets of commands depending on the type of vNIC you have.

For the E1000E:

$NICNameE1000E = Get-NetAdapter | Where-Object { $_.InterfaceDescription –Like "Intel(R) 82574L Gigabit Network Connection" } | Select -expand nameSet-NetAdapterAdvancedProperty -Name $NicNameE1000E –DisplayName "Jumbo Packet" –DisplayValue "9014 Bytes"

For the E1000:

$NicNameE1000 = Get-NetAdapter | Where-Object { $_.InterfaceDescription –Like "Intel(R) PRO/1000 MT Network Connection" } | Select -expand nameSet-NetAdapterAdvancedProperty -Name $NicNameE1000 –DisplayName "Jumbo Packet" –DisplayValue "9014 Bytes (Alteon)"

For the VMXNET3:

$NicNameVMXNet = Get-NetAdapter | Where-Object { $_.InterfaceDescription –Like "vmxnet3 Ethernet Adapter" } | Select -expand nameSet-NetAdapterAdvancedProperty -Name $NicNameE1000 –DisplayName "Jumbo Packet" –DisplayValue "Jumbo 9000"

As always – Use any tips, tricks, or scripts I post at your own risk.

HOWTO: Approve just the #WSUS updates that are needed using #PoshWSUS and #PowerShell on a schedule

Recently we deployed a new “do-all, be-all” server (AD, WSUS, etc) to a small client with very poor bandwidth availability.  Just allowing WSUS to auto-approve every published update across all categories and all select products just wasn’t an option (and really shouldn’t be anyways) because it would have taken a month to download them over 3Mbps DSL.  So I wanted to only approve and download those updates that were needed, as opposed to WSUS built-in process of automatic approve everything in a classification or product then immediately trying to download it.

For a bit more background information, typically we configure WSUS at our smaller “hands off clients” to check for new updates at 4 am daily (although I’m considering switching to manual synchronization and using PowerShell to invoke the check on a schedule that is more “robost” shall we say.  This gives us about a day to vet the basic updates on our own production system (which is typically close in configuration to our smaller “hands off clients”) before the updates auto-approve after synchronization at the client locations.

In the past I have played with the native Windows Server Update Services PowerShell cmdlets, but lets be honest, they are only about half baked and certainly not ready for enterprise IT production (I’m really not sure what Microsoft was thinking).  The inability to auto-accept EULAs is bad.  Even worse is that if there is a EULA waiting to be accepted, Approve-WsusUpdate just pukes, exits, and refuses to acknowledge, and refuses to approve any other updates (even without EULAs on them).  So this means there really is no hands free way provided by Microsoft to auto-approve just the needed updates as they come out…

After some research, I settled on PoshWSUS.  In my honest opinion however, it is not well documented or supported (but it is good given the resources the author likely has at his disposal)…  It took me 4 hours of scouring Google and trial and error to come up with this basic script, which simply looks at all the needed updates and approves them, in the fewest lines of PowerShell possible.  In the end I had to mash together both the native WSUS PowerShell cmdlets and the PoshWSUS cmdlets to make this work, but it does work (so far anyways).

So, download PoshWSUS_2_3_1_0.zip from GitHub, drop it in C:\Windows\System32\WindowsPowerShell\v1.0\Modules and lets go…

First of all, we need to find just updates that are needed – err – rather **ALL** the updates that are needed.  I didn’t find a way in PoshWSUS to do this, but the native WSUS cmdlets let you do this.  Great – but you can’t pipe these updates (directly out of Get-WsusUpdate) into PoshWSUS’s Approve-PSWSUSUpdate, and I couldn’t find any way to get all needed updates out of Get-PSWSUSUpdate (which can pipe to Approve-PSWSUSUpdate), so I needed to get creative…  Get-PSWSUSUpdate, using a piped Where will allow you to select by the UpdateId, and Get-WsusUpdate will output UpdateId…  Hmmm….

Now – how to get the UpdateId from Get-WsusUpdate to Get-PSWSUSUpdate…  How about by piping the UpdateId via >> to a text file, then use foreach to read that text file into Get-PSWSUSUpdate, which then pipes to Approve-PSWSUSUpdate…  It’s ugly, it’s slow, but hey it works, and should only take a minute or two to run even on the heaviest of Patch Tuesdays…  And along the way, the text file needs cleaned up before being fed into Get-PSWSUSUpdate.

So here is the entire process (save this script as C:\Windows\WSUS_Updates_Approval.ps1)…

Import-Module PoshWSUS
$DNSDomainName=$env:userdnsdomain
$ThisComputersFQDN = "$env:computername"+"."+"$DNSDomainName"
Connect-PSWSUSServer -WsusServer $ThisComputersFQDN -Port 8530
$UpdateIDFile = "C:\Windows\Temp\UpdateIDFile.txt"
If (Test-Path $UpdateIDFile){Remove-Item $UpdateIDFile}
Get-WsusUpdate -Approval Unapproved -Status Needed | Select-Object UpdateId >> $UpdateIDFile
(Get-Content $UpdateIDFile| Select-Object -Skip 3) | Set-Content $UpdateIDFile
(Get-Content $UpdateIDFile| Foreach {$_.TrimEnd()}) | Set-Content $UpdateIDFile
$Groups = Get-PSWSUSGroup -Name 'All Computers'
foreach ($NewUpdateID in get-content $UpdateIDFile) {Get-PSWSUSUpdate | Where {$_.UpdateID -eq "$NewUpdateID"} | Approve-PSWSUSUpdate -Action Install -Group $Groups -Confirm:$false}

Finally, we just need to schedule this script to run on a regular basis… I typically schedule it to run every 15 minutes.  To do that, run this in an Administrative Command Prompt:

schtasks /create /tn "WSUS Updates Approval" /tr "\"C:\Windows\System32\WindowsPowerShell\v1.0\powershell.exe\" -ExecutionPolicy RemoteSigned -noprofile -File C:\Windows\WSUS_Updates_Approval.ps1" /sc minute /mo 15 /st 00:02:00  /rp "*" /ru "%userdomain%\%username%"

As always – Use any tips, tricks, or scripts I post at your own risk.