When I originally started using WordPress.com for hosting this blog many years ago, SSL was a secondary thought for most people (and for some developers I know, it still is today). That said, at some point WordPress.com configured redirection for my blog from http to https, but never notified me. I recently discovered that I was getting certificate mismatch errors when accessing my blog (normally I sign in via WordPress.com, so I wasn’t seeing the certificate errors that my visitors were). So I set out to fix the SSL error, and here’s what I found and how I ultimately fixed the issue. I’m posting this because even after a bunch of research I couldn’t find the answer online anywhere.
And as always before I begin:
Use any tips, tricks, or scripts I post at your own risk.
In my case, my domain name is registered with GoDaddy and the DNS is also hosted with GoDaddy. I’m not keen on transferring my domain or DNS hosting to WordPress.com to take advantage of their automated tools either. When I originally setup my blog, the instructions from WordPress.com was to create a CNAME and point it at them. And this is a screenshot of that DNS record.
My blog has happily functioned off this record for years, but obviously without a valid SSL certificate for it.
So when I discovered that WordPress.com was now redirecting my site to https, I started to investigate why a proper SSL certificate was not being used. After poking around in my domain on the WordPress.com management portal, I found this.
Clicking “Provision Certificate” simply gave me an error that said “Sorry, we weren’t able to provision the certificate. Please verify your DNS configuration and try again”.
Checking my DNS entries for a CAA record clearly shows that letsencrypt.org is authorized to issue certificates for my domain.
And checking the record with a DNS CAA tester indicated the blog.jbgeek.net was good.
After thinking about it for a while however, I decided maybe the issue was I needed a CAA record specifically blog.jbgeek.net, so I attempted to create one, which as you can see below, failed with a cryptic “DNS rules violation for blog record”.
I was able to recreate CAA records for other names (i.e. myblog and www) though. Upon further research, it turns out that as per IETF standard RFC 8659, which governs CAA records, it’s not possible to have a CNAME and CAA record of the same name. So I had a choice, I could have CNAME pointing my blog to WordPress.com, or I could have a CAA record for blog, but that would be useless since there was no CNAME.
Eventually I managed to force my way through WordPress.com’s AI “help” bots and got ahold of what I believe is a real person (however in this day and age, one never knows). After providing all the details and screenshots from above, the individual told me they would do some research and get back to me later via email once they had an answer. To be honest, I didn’t hold much hope of ever hearing from them again.
My to my surprise though, several hours later I received an email from them asking me to delete the CNAME and create two A records for blog.jbgeek.net pointing at 192.0.78.24 and 192.0.78.25. I did so, and then immediately hit the Provision Certificate button only to get the same error. I decided to be patient and wait for a bit for DNS replication to occur and caching to time out (my TTL was only 10 minutes, so it wouldn’t take long). When I came back to my desk to check it 30 minutes later, I found a new certificate had automatically been issued and applied to my site!
Hopefully this will help some one else who is stuck in the same situation.
Last month HPE released VM Essentials 8.0.8 (given that I’ve been lazy over the summer, 8.0.9 is already available however as I write this) with built in support for migrating VMs from VMware to VME! One of the prerequisites for a successful migration is to inject the Virtio drivers in the VMware VM before starting the migration process. This is not just as simple as mounting the virtio-win-0.1.271 iso image in the VM and double clicking the virtio-win-gt-x64.msi to install it. You actually need to inject the drivers offline to properly accomplish this. And I’m going to show you here how to do that.
And as always before I begin:
Use any tips, tricks, or scripts I post at your own risk.
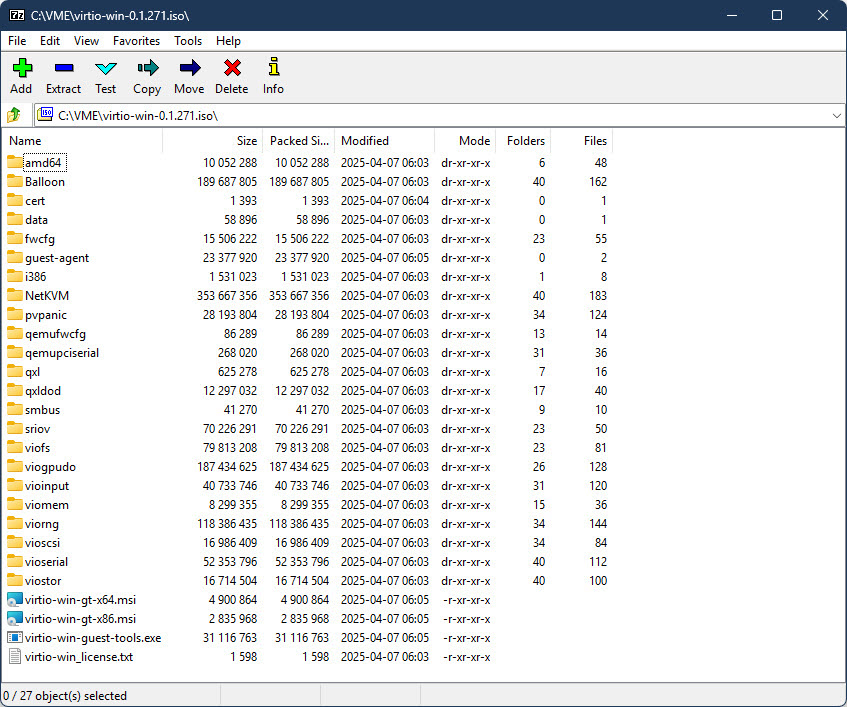
First you will want to extract the .iso image somewhere (I will be using C:\VME\virtio-win-0.1.271 here) with 7-Zip (I am going to assume you already have this .iso downloaded, if not you can find the latest version here). If you look at the contents of the .iso, you’ll find it includes drivers for many Windows OS versions including XP, W7, W8, W10, W11, plus all the server versions from 2003 to 2025.
If you are going to migrate a Windows Server 2022 VM (which is what I’m using as my OS for this post), you probably don’t want to inject the drivers for Windows XP! Now if you are energetic, you could just go manually delete all those OS folders in each driver class, or manually just pick out the drivers you want. I’m not energetic however, and I prefer to work smarter not harder (some might call it lazier though) so I use PowerShell to only give me the drivers I actually need.
Open a PowerShell prompt and paste the following commands:
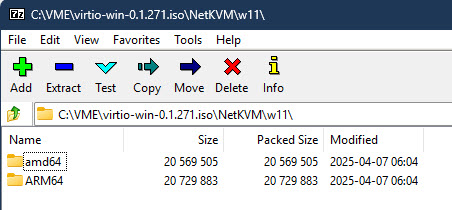
In the example above, Get-ChildItem will go through every top level folder inside of C:\VME\virtio-win-0.1.271 and delete any folder not named 2k22, leaving you with just the drivers for Windows Server 2022. I then like to rename C:\VME\virtio-win-0.1.271 to WIN2022_VIRTIO_DRIVERS (just makes it easier to differentiate for the OS, obviously I replace the Windows version as required in the folder name). As I am constantly building new images and will have a multitude of different OSes for migration, I went ahead and repeated the above steps until I had separate folders for W10, W11, W2016, W2019, W2022, and W2025. One thing to note is that for W11, the drivers are further divided into AMD64 and ARM64 folders under the W11 folder. This is where I became lazy and just manually deleted the ARM64 folders as I don’t expect to ever need them and I only wanted the AMD64 drivers for W11.
At this point, I recommend you go into the WIN2022_VIRTIO_DRIVERS folder and removed the x86 .msi file and also manually removed the i386 folder out of the root (it has W10 x86 drivers in it). And remove the i386 .msi in the guest-agent folder (you aren’t going to need these unless you are running a 32 bit Windows instance).
Since you are going to be copying WIN2022_VIRTIO_DRIVERS to every Windows 2022 Server VM you are going to migrate I also recommend you drop a copy of the PowerShell script to remove VMware Tools into this folder too, which you will run after the migration process. Here’s a link to the script I have been using to remove VMware Tools after migration: https://gist.github.com/broestls/f872872a00acee2fca02017160840624 (thank you Sean Broestl for creating this script)
Now copy WIN2022_VIRTIO_DRIVERS to C:\ in the Windows 2022 Server VM that you want to migrate to VME.
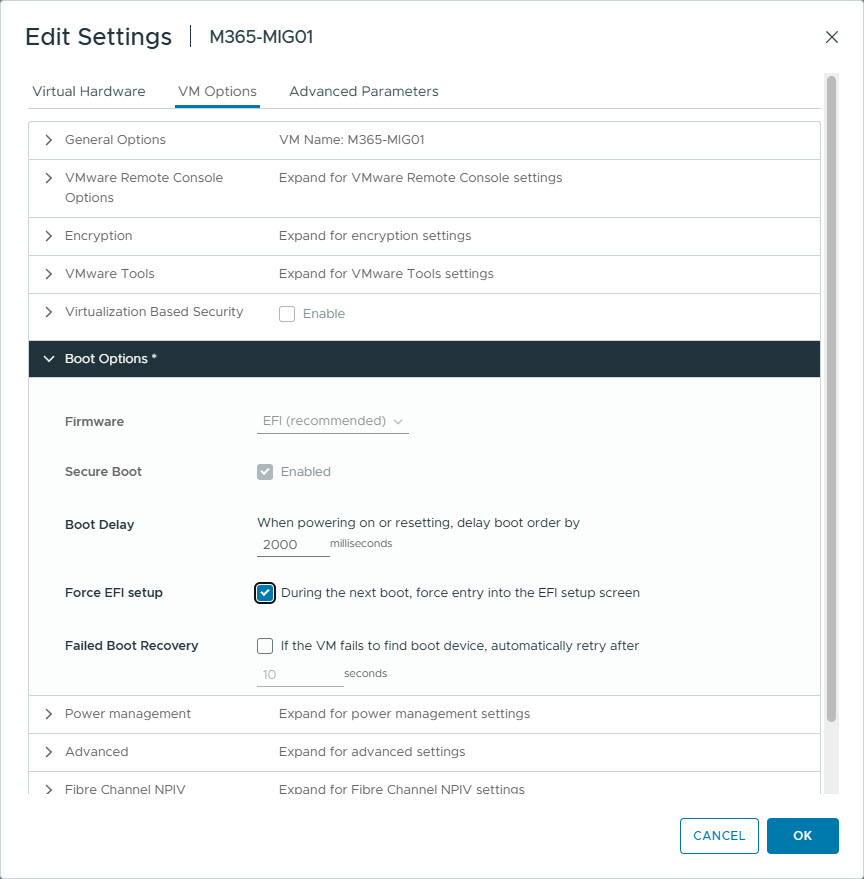
Connect to the VMware Remote Console of that VM and attach the Windows Server 2022 .iso to it. Now edit the VM to force it to boot to UEFI setup (so you can select the .iso to boot from), and reboot the VM.
Once at the UEFI boot menu, select the CD drive and wait for the Windows 2022 Server setup to start.
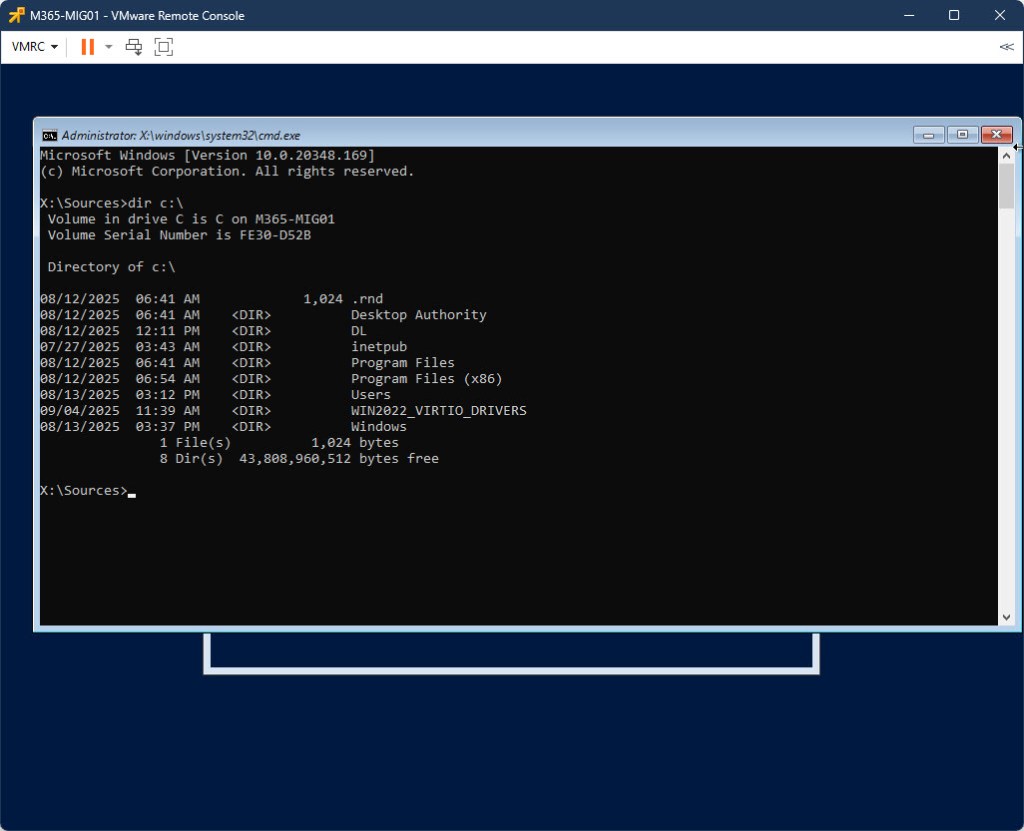
Once at the Setup Welcome screen, and within the VMware Remote Console, press SHIFT + F10 to open a command prompt and verify you can see the C: drive (including the WIN2022_VIRTIO_DRIVERS folder). If necessary scroll through all the drive letters until you find it and substitute C: for that drive letter for the next step. If you do not see your drive, then you probably need to inject the VMware SCSI drivers into your .iso image (which is a totally different blog post).
Now inject the drivers into C:\Windows using the following command:
You can safely ignore any “Error 50” messages (if you see any) – it’s not relevant to this process. Once the drivers have been added, reboot the VM with the following command:
wpeutil reboot
Once back in Windows, install C:\WIN2022_VIRTIO_DRIVERS\virtio-win-gt-x64.msi and reboot again.
Do not bother running C:\WIN2022_VIRTIO_DRIVERS\virtio-win-guest-tools.exe yet – it will fail to install because the hypervisor is still VMware.
Make sure you disconnect the .iso image from the VM before continuing. At this point – your VM is ready for migration. I will be covering the actual migration process in a different post, however the follow up steps related to this post are below.
Once you have migrated your virtual machine from VMware to VME, log back into the VM. VMware Tools will mostly crash on login. Ignore this for a moment and run C:\WIN2022_VIRTIO_DRIVERS\virtio-win-guest-tools.exe. Once that is done, open PowerShell and run C:\WIN2022_VIRTIO_DRIVERS\Remove_VMwareTools.ps1. Reboot when the script finishes, and you should now have a working VM migrated from VMware to VME!
I recently migrated a virtual machine from VMware to HPE VM Essentials (VME) and discovered that the migration process created the new VME VM as UEFI based when it was actually supposed to be BIOS based, and a result, the OS would not boot under VME. Unfortunately, at the time of this writing, VME Manager (8.0.9) does not provide any means to accomplish this via the WebUI in Manager. This meant I needed to edit the VM definition and change it. While it is possible to accomplish, this is very unsupported by the VME team as you need to manually edit the .xml definition file (which they do not support). That said, I’m guessing if you are hear reading this, you don’t care and just want your VM to boot… So lets get to it!
Please note: Use any tips, tricks, or scripts I post at your own risk.
From the HVM host console that hosts the VM, ensure the VM is shut off and then run:
virsh edit VMNAME
(Note – VMNAME is case-sensitive throughout these instructions)
Approximately 24 lines down, you will see the following two sections for <os> and <features> (if the VM is UEFI based):
(Note – I apologize because the xml formatting above is not correct – I’ve struggled the last hour with WordPress.com’s stupid editor to fix this and I give up – it’s a piece of shit, and they want to charge me a bunch more money to get a plugin to fix this, which I refuse to do).
To convert this VM to BIOS based, delete the following two lines from <os>:
To delete lines in virsh edit, you can just put your cursor on the line to delete and press the letter d twice quickly. To save the configuration in virsh, press Esc, : (colon), and enter wq! and hit enter. Assuming you did not mess the editing up, the file will save. If you see “Failed. Try again? [y,n,i,f,?]”, then press N to completely discard the changes you made and start again. Pressing Y will take you back to the configuration with your changes still present, but unless you know exactly what you did wrong, I do not recommend doing this.
Remove the now unrquired NVRAM file: rm /var/lib/libvirt/qemu/nvram/VMNAME_VARS.fd
Now you should be able to start your VM (virsh start VMNAME)
If need to convert from BIOS to UEFI, use the same method, except in virsh edit, press the letter i (eye) to enter insert mode and update the <os> and <features> sections to mirror above. Take note that you need to update the NVRAM file name, and then back in the console will you need to:
I recently had a customer sign a HPE GreenLake dHCI contract that included a new Nimble AF40 to replace a 4 year old AF20Q, and we completed the migration this past week. As a MSP, a critical part of the deployment services that we provide our clients includes the sanitizing (or secure wiping) of any products we replace, and this AF20Q was no exception, other than it’s the first 5th generation Nimble we’ve decommissioned. HPE does provide a KB article in Infosight on the necessary steps (search for “KB-000361 Array Sanitization”). And while it is a good guide, it doesn’t totally cover everything you should know to be prepared for prior to starting this process. I should also note, that if you run this sanitization process, when you are done the Nimble becomes nothing more than a boat anchor as it will not have any sort of OS on it to boot from. If you plan to repurpose or reuse it after sanitizing, you will need to reinstall the Nimble OS from two USB keys that you can obtain from Nimble Support. I’d like to share my experiences in this process in the hopes that it will save someone else a headache (both literally and figuratively).
If your Nimble is running an OS version earlier than 5.0.3.0, then these instructions are not for you! You will need to contact Nimble support to obtain two bootable USB keys with the sanitization process on them. If your Nimble is running OS 5.0.3.0 or newer, then you should be good to go with these steps as I’ve written them out.
And as always before I begin:
Use any tips, tricks, or scripts I post at your own risk.
We’ll start with the obvious. Make sure the array your are sanitizing is the correct array, that it’s had all the hosts disconnected from it, and that it has all the volumes / data removed from it in the Nimble’s management console. And of course, ensure the customer actually want’s it sanitized!
In my case, after completing the migration from the AF20Q to the customer’s new AF40, I removed the array from the customer’s rack, brought it back to my office and set it on my workbench, which is 6 feet away from my desk. This was my first mistake – once you boot the unit to begin sanitization, the fans kick up to high, and they don’t stop! This AF20Q had 12 x 960GB SSDs in it, and the sanitization process took about 8 ¼ hours from power on to power off. With the fans running at high! Needless to say, we found a way to move this unit into another room without powering it down (not recommended, but I had already started the sanitization process and couldn’t stop) and without unplugging a single cable or moving my notebook off the top of it! So if you have a Nimble to sanitize, think very carefully about where it is going to be sitting and the prolonged noise levels that are going to occur during the sanitization process!
Next, when I talked to Nimble support prior to starting the sanitizing, they warned me not to close the serial console sessions to the array once I start the process until it ends, otherwise you’ll have no way to monitor the process (and you’ll never actually know if it completed or not). I would strongly recommend you utilize a dedicated notebook for the task and disable all power management, screensavers, lock screens, and obviously plug it into power with its power brick.
The picture below is after I had finished because as you can see the array has no power cables plugged in and my notebook is powered off.
You should find attached to the back of the Nimble a pair of male DB9 to 3.5mm plug serial adapters (the 3.5mm plug looks like wired headphone jack). You’ll need these, along with two USB to Serial (DB9 – male) adapters, and two DB9 (female / female) serial cables. Plug both USB to Serial adapters into the notebook, and open Windows’s Device Manager to determine the com port numbers associated with each. Plug the other end of the USB to Serial adapter into the DB9 f/f cable and the other end of the DB9 f/f cable into the DB9 to 3.5mm serial adapter. The 3.5mm plug goes into the back of each controller.
With the Nimble still booted up and running, open Putty, and create a serial connection (115200, 8, N, 1) using the correct com port to Controller A. Then open Putty again and create a second connection using the correct com port to Controller B. When you hit enter in each Putty session, you should get a login prompt from the array. Don’t bother trying to login though (it wouldn’t accept the array’s admin credentials when I tried it). All you care about at this time is that you have connectivity via the serial console and can see the console output and that it responded to the keyboard input. The reason you are doing this with the array still booted and running is to verify you can actually see the serial console output via your serial adapter setup – my initial attempt didn’t give me console output and I had to go find a different serial cable. Had I not tested this in advanced, I probably would have gotten impatient and started messing with the settings and stuff before the serial console started outputting any text during the boot process and I would have missed it.
Now you need the Sanitization key (password). For this – you need to call Nimble Support (1-877-364-6253 if you are North American based) and they will generate a Sanitization key which they will email to you. Support told me the key is valid for 24 hours, although KB-000361 says it’s closer to 48 hours – either way, once you have the key, you are on a clock to start.
**Note – I do not know if the array must have a valid support contract on it for them to give you a key – this one still had a contract on it.**
Once you have the key and are ready, open Putty and make your two separate serial connections. I strongly recommend you arrange the two sessions on your screen so they are literally side by side, top to bottom (see picture further below), because you are going to need to be able to see the output of each simultaneously, and you are going to need to interact with both side by side simultaneously (trust me – you do not want to be alt-tabbing trying to find these sessions in the 3 seconds you have to make the correct selection in each – close everything else up except these two sessions!). Open a 3rd Putty session (it can be over top your two serial connections for now though) and this time SSH the management IP of the array and login as admin.
You are now going to reboot the entire array (so both controllers), **AND** (this is important), you must be ready to jump from one serial console to the other at almost the same time to select the correct boot option once it reboots (so get your coffee and use the washroom if you need before you reboot the array instead of thinking you can do so while it’s restarting)!
In order to reboot the array, you need to know the array’s name. To find this, in the SSH session (logged in as the Nimble admin user account) type:
array --list
Then, to reboot the array, you are going to type:
reboot --array array_name
Answer the confirmation for reboot, and after a few seconds, your SSH session will terminate. Close this terminated SSH Putty window and switch to your two Putty serial console sessions (again, they should now be side by side on your screen as shown below). You probably won’t see any activity at all for what seems like 2 or 3 minutes in these sessions. Then suddenly in both sessions (one may be slightly slower than the other – in my case Controller A was about ½ second behind Controller B in all these steps) you’ll see the “Intel® iSCSI Remote Boot” prompt appear for 2 or 3 seconds, and the screen will clear and a few seconds later you’ll see an Intel BIOS screen with [ENTER], [F2], [F6], [F12] options at the bottom of the text.
Get prepared to act fast! A few seconds later this too will disappear and you’ll see a normal grub boot loader page appear with 3 boot options. In the Putty session this appears in first, hit the down arrow twice to move to the 3rd option – “Nimble Array Appliance Sanitization Boot” and hit enter (to select it), then very quickly move to the other Putty serial session and do the same thing. Your total window of opportunity for this is about 3 seconds for both Putty sessions combined – if you miss it (on either controller), immediately pull the power cables from the array, wait 15s, and then plug them in and try again.
So to be perfectly clear – you must boot both controllers with the grub menu option of “Nimble Array Appliance Sanitization Boot”.
And sorry – but I didn’t actually get a picture of that screen, but here’s what it looks like just prior to the grub boot menu opening – as I mentioned Controller A was lagging about ½ second behind Controller B, so that is why the Putty session for COM4 is mostly empty – it populated and looked just like COM5 as I finished the screenshot.
After a minute or two, you’ll find yourself with two Putty serial console sessions full of yellow text. Eventually the output will show you the number of HDDs and SSDs detected in the system, along with an estimate of how long it will take to complete the sanitization (in my case, it predicted approximately 10 hours for 0 HDDs and 12 SSDs, but it really took about 8hr to complete based on the time stamps in my screenshots). Verify these drive count numbers match what you are expecting. If your drive count is what you expect it to be then continue on, otherwise you’ll need to troubleshoot why you aren’t seeing all the drives (perhaps you forgot to power on the expansion shelf first or something if you don’t see what you are expecting). It will also show you the Nimble serial number, the current time (in UTC), and be prompting you for the Sanitization Key.
Working in the Putty serial console session for Controller A (the serial console output refers to this as Controller 0), copy and paste the Sanitization Key into the session from the email you received from Nimble Support. Next you’ll be prompted for the type of sanitization you wish to perform. Your options are:
1.) All Drives and NVDIMM 2.) NVDIMM Only 3.) Drives Only 4.) Quit
**WARNING – There is no going back and no yes/no confirmation when you select one of these options, so make sure you are fully certain you are really ready to destroy this Nimble.**
Select option 1 and the secure wipe / sanitization process immediately starts.
You’ll first see the screen scroll with the NVRAM being zero’d out. This happens pretty much instantaneously. Next, the array will begin to write to all the drives. It does this in 4 different phases, and those phases differ depending on whether the drive is a HDD or SSD. For each hard drive, it writes all zeros to the drive, then it writes all ones to the drive, then it writes a random pattern, and then finally it verifies the random pattern. For each SSD, it writes a random pattern, then verifies the random pattern, then it writes another random pattern, which it then verifies again.
The only time your serial console will show activity is at the beginning of each new phase of writing / verifying, or when the sanitization is complete. This is why you don’t want to disconnect /close your Putty serial console sessions, because otherwise you will not be able to determine what phase you are in or if the process has completed.
Once the secure wipe completes on all the drives, you’ll see a pass/fail result for each drive, along with a statement that the Array Sanitization has completed.
Congratulations – you now have a new boat anchor (or a completely sanitized array if you want to look at it that way too)! You can now pull the power cables from the array and proceed to safely dispose of the asset in an environmental friendly way.
But what if you want to repurpose this array now? That blog post is for another day, but will be coming soon. Stay tuned!
This morning was vCenter update day for me. I had 15 customer vCenter instances that all needed upgraded from 7.0.3.01000 to 7.0.3.01100, so I grabbed a cup of coffee and got started. 14 of the 15 completed with out a hitch, but there is always one! This one vCenter server failed to install the patch, leaving me with a dead vCenter. And this particular vCenter is residing on an HPE Simplivity cluster.
In case you didn’t know, Simplivity has it’s own built in backup and restore mechanism, which is generally accessed via the vCenter client. Which is cool, until your vCenter is dead, and you need to restore your vCenter from those backups, which is done via vCenter (that same dead vCenter you are attempting to restore). Then what do you do? HPE’s documentation on this isn’t super clear. I’d been down this same road earlier this year, so I had already trudged through the framework of what to do once, but I actually hadn’t written down. So this time – not only am I documenting it, I’m sharing it with you!
And as always before I begin:
Use any tips, tricks, or scripts I post at your own risk.
Open Putty and ssh one of the OmniStackVC VMs.
Login as svtcli / yourpassword(this is your emergency password)
Find the available backups: svt-backup-show --emergency
The first column shows the Datastore name. The second column is the VM name. The third column is the backup name and will generally correspond to the backup time. It’s possible to do more granular searches with svt-backup-show. Use --help to get the parameters if you need to narrow down the results.
If the VM has been deleted, then it’s name will show as “VMNAME [Deleted] YYYY-MM-DDTHH:MM:SS+OFFSET” in this list (i.e. “VCENTER01 [DELETED 2022-12-10T13:20:34+0000]” in my example below)
**Note** Your text may be wrapped in Putty – I recommend copying and pasting the text out of Putty into Notepad++ or some other editor for easier reading.
To restore the VM, you’ll need to know the Datastore, the Object, and Backup Name (which is the time of the backup) you are restoring. The syntax for a restore is this:
So in my case, it was: svt-backup-restore --datastore “SVT-DS02” --vm “VCENTER01 [DELETED 2022-12-10T13:20:34+0000]” --backup “2022-12-10T07:00:00-04:00” --emergency –force
If everything worked correctly, you should see a Task Complete. The VM will then be restored into a new folder on the original datastore.
**Note** It may take a minute or two before the restored VM actually appears on the datastore. Be patient! If you simply hit the up arrow and hit enter again to run the restore again, you’ll end up with another copy!
If your original VM has been deleted, then you can safely rename this folder as required to match the original VM’s name. I’m taking these screenshots after the fact, so the existing VCENTER01 shown below is the one I restored earlier this morning (and is now back into production) which inspired this writing – the VCENTER01-restored-blahblahblah is the one I just restored in the screenshots above for my documentation.
Now you can log into the WebUI of one of your ESXi nodes as root, register the recovered vCenter, and power it on. To register the VM, right click Virtual Machines, select “Create/Register VM”, select “register an existing Virtual Machine”, navigate to the datastore and select the restored .vmx file.
**Note** I’m not particularly happy with the editor in WordPress anymore… If anyone knows how I can write these posts in Outlook or Word and then copy and paste (including the formatting) into WordPress, please let me now.
Recently, I had a customer who needed to expand the number of Windows Server 2019 instances in their Citrix Virtual Apps pool to be able to support more work from home staff. As the base image was rather complex with many traditional apps (and absolutely no Appx packages in use), rather than manually build a new 2019 server image, I decided to clone one of the existing servers and then just sysprep it. However, when I ran sysprep on the cloned server – it not surprisingly failed. The reason I say not surprisingly is because the base instances were all originally Windows Server 2016 which had over time been inplace upgraded to 2019. And we all know that Microsoft doesn’t support sysprep on inplace upgraded OSes anyways. Plus – with roaming user profiles, Appx packages end up “installed” for users that don’t actually exist in the OS instance anymore, but the Appx management mechanism fails to cleanup after itself. So what’s a fellow to do?
Well – first off, give the middle finger to Microsoft, and then find a way to work around it… And if you are here reading this, I’m guessing you’ve already given that middle finger to Microsoft and are now looking for a way to work around it…
I’m about to share how I worked around it and successfully sysprepped that clone of the production 2019 instance. I will also apologize to you in advance as WordPress has made some rather undesirable changes to it’s editor and posting system and I’m currently struggling to format this post correctly, so I’m not sure how this post is actually going to turn out…
And as always before I begin:
Use any tips, tricks, or scripts I post at your own risk.
Verify the only user account defined on the machine is for Administrator, and that C:\Users only contains Administrator, Default, and Public folders. Also verify that “Computer\HKEY_LOCAL_MACHINE\SOFTWARE\Microsoft\Windows NT\CurrentVersion\ProfileList” only contains the SID for the local Administrator along with S-1-5-18, S-1-5-19, and S-1-5-20.
Before continuing, I would strongly recommend shutting down the machine at this point and taking a snapshot of it…
psexec -i -d -s “C:\TEMP\DB Browser for SQLite\DB Browser for SQLite.exe” “C:\ProgramData\Microsoft\Windows\AppRepository\StateRepository-Machine.srd”
In the DB Browser, drop all triggers with the following SQL statements (you should be able to cut and paste the entire list below all at once into the “Execute SQL” tab and then click the “Execute all” button) :
DROP TRIGGER “TRG_AFTERDELETE_DynamicAppUriHandlerGroup_DynamicAppUriHandler”;
DROP TRIGGER “TRG_AFTERDELETE_PackageUser_AppExecutionAliasUser_DynamicAppUriHandlerGroup”;
DROP TRIGGER “TRG_AFTERDELETE_PackageUser_Key”;
DROP TRIGGER “TRG_AFTERDELETE_Package_Key”;
DROP TRIGGER “TRG_AFTERDELETE_PrimaryTileUser_Key”;
DROP TRIGGER “TRG_AFTERDELETE_SecondaryTileUser_Key”;
DROP TRIGGER “TRG_AFTERINSERT_Application”;
DROP TRIGGER “TRG_AFTERINSERT_Package”;
DROP TRIGGER “TRG_AFTERINSERT_PackageFamily_SRJournal”;
DROP TRIGGER “TRG_AFTERINSERT_PackageUser_Key”;
DROP TRIGGER “TRG_AFTERINSERT_PackageUser_PackageFamilyUser”;
DROP TRIGGER “TRG_AFTERINSERT_PackageUser_SRJournal”;
DROP TRIGGER “TRG_AFTERINSERT_Package_Key”;
DROP TRIGGER “TRG_AFTERINSERT_PrimaryTileUser_Key”;
DROP TRIGGER “TRG_AFTERINSERT_SecondaryTileUser_Key”;
DROP TRIGGER “TRG_AFTERINSERT_User_SRJournal”;
DROP TRIGGER “TRG_AFTERUPDATE_PackageUser__Created_LongRunningTransactionUpdateDuringCommit”;
DROP TRIGGER “TRG_AFTERUPDATE_Package__Created_LongRunningTransactionUpdateDuringCommit”;
DROP TRIGGER “TRG_AFTER_UPDATE_Application_SRJournal”;
DROP TRIGGER “TRG_AFTER_UPDATE_PackageFamily_SRJournal”;
DROP TRIGGER “TRG_AFTER_UPDATE_PackageUser_SRJournal”;
DROP TRIGGER “TRG_AFTER_UPDATE_Package_SRJournal”;
DROP TRIGGER “TRG_AFTER_UPDATE_User_SRJournal”;
DROP TRIGGER “TRG_BEFOREDELETE_Application_SRJournal”;
DROP TRIGGER “TRG_BEFOREDELETE_PackageFamily_SRJournal”;
DROP TRIGGER “TRG_BEFOREDELETE_PackageUser_PackageFamilyUser”;
DROP TRIGGER “TRG_BEFOREDELETE_PackageUser_SRJournal”;
DROP TRIGGER “TRG_BEFOREDELETE_Package_SRJournal”;
DROP TRIGGER “TRG_BEFOREDELETE_SRJournal_SRJournalArchive”;
DROP TRIGGER “TRG_BEFOREDELETE_User_SRJournal”;
DROP TRIGGER “TRG_IDX_ActivityContext_ProductId”;
DROP TRIGGER “TRG_IDX_AppUriHandler_ProgID_Extension”;
DROP TRIGGER “TRG_IDX_AppxExtension_User_Package_Category_KeyString_RegistrationInformation”;
DROP TRIGGER “TRG_IDX_BackgroundServiceAgent_ProductId_TaskId_BackgroundSpecifier_BackgroundName_BackgroundSource_BackgroundType__WorkId”;
DROP TRIGGER “TRG_IDX_BundlePackage_Bundle_Version_Architecture_ResourceId__WorkId”;
DROP TRIGGER “TRG_IDX_DynamicAppUriHandler_ProgID_DynamicAppUriHandlerGroup”;
DROP TRIGGER “TRG_IDX_OptionalBundlePackage_OptionalBundle_Version_Architecture_ResourceId__WorkId”;
DROP TRIGGER “TRG_IDX_Package_PackageFamily_ResourceId_Architecture_Version__WorkId”;
DROP TRIGGER “TRG_IDX_PublisherCacheFolder_PackageExtension_FolderName”;
DROP TRIGGER “TRG_IDX_WorkInProgress_Key”;
DROP TRIGGER “TRG_IDX_XapExtension_Consumer_Supplier_ExtensionCategory_ExtensionId_SupplierTaskId__WorkId”;
DROP TRIGGER “TRG_IDX_Xap_ProductId__WorkId”;
Now, drop all the user records with the following SQL commands (clear the Execute SQL window of the trigger drop statements and paste these instead, then and execute them):
DELETE FROM PackageFamilyUser;
DELETE FROM PackageUser;
DELETE FROM PackageUserChangeLog;
DELETE FROM PrimaryTileUser;
DELETE FROM PrimaryTileUserChangeLog;
DELETE FROM DeploymentHistory;
If the machines was inplace upgraded from Windows Server 2016, drop the 2016 specific packages as well:
DELETE FROM Package where PackageFullName like “%14393%”;
DELETE FROM PackageIdentity where PackageFullName like “%14393%”;
DELETE FROM MrtApplication where DisplayNameReference like “%14393%”;
DELETE FROM MrtPackage where DisplayNameReference like “%14393%”;
Next, check Package, PackageIdentity, MrtApplication, and MrtPackage tables for left over packages from Windows Server 2016 and delete any found. Examples of these left over packages after an inplace upgrade are:
In my experience, 1527c705-839a-4832-9118-54d4Bd6a0c89_10.0.17763.1_neutral_neutral_cw5n1h2txyewy was always the first native 2019 package when sorting by “package_ID”. Also note that there could be duplicate packages here (i.e. PrintDialog 6.2.0.0 and 6.2.1.0), so start by only deleting the older one (it will generally have a package_ID that is lower than 1527c705-839a-4832-9118-54d4Bd6a0c89_10.0.17763.1_neutral_neutral_cw5n1h2txyewy).
Now recreate the trigger statements (clear the Execute SQL window of the delete statements and paste these instead and execute them):
CREATE TRIGGER TRG_AFTERDELETE_DynamicAppUriHandlerGroup_DynamicAppUriHandler AFTER DELETE ON DynamicAppUriHandlerGroup FOR EACH ROW WHEN is_triggers_enabled()BEGIN DELETE FROM DynamicAppUriHandler WHERE DynamicAppUriHandlerGroup=OLD._DynamicAppUriHandlerGroupID;END;
CREATE TRIGGER TRG_AFTERDELETE_PackageUser_AppExecutionAliasUser_DynamicAppUriHandlerGroup AFTER DELETE ON PackageUser FOR EACH ROW WHEN is_triggers_enabled()BEGIN DELETE FROM AppExecutionAliasUser WHERE User=OLD.User AND ApplicationIdentity NOT IN (SELECT ai._ApplicationIdentityID FROM ApplicationIdentity AS ai INNER JOIN Application AS a ON a.ApplicationUserModelId=ai.ApplicationUserModelId INNER JOIN PackageUser AS pu ON pu.Package=a.Package WHERE pu.User=OLD.User);DELETE FROM DynamicAppUriHandlerGroup WHERE User=OLD.User AND PackageFamily NOT IN (SELECT p.PackageFamily FROM Package AS p INNER JOIN PackageUser AS pu ON pu.Package=p._PackageID WHERE pu.User=OLD.User);END;
CREATE TRIGGER TRG_AFTERDELETE_PackageUser_Key AFTER DELETE ON PackageUser FOR EACH ROW WHEN is_triggers_enabled() AND OLD._WorkId=0 BEGIN UPDATE Sequence SET LastValue=LastValue+1 WHERE Id=1;INSERT OR REPLACE INTO PackageUserChangelog(_Revision, _WorkId, _Created, _Deleted, User, Package, _PackageUserID, WhenOccurred, _Dictionary)SELECT 1, workid(), OLD._Created, s.LastValue, OLD.User, OLD.Package, OLD._PackageUserID, now(), NULL FROM Sequence AS s WHERE s.Id=1;END;
CREATE TRIGGER TRG_AFTERDELETE_Package_Key AFTER DELETE ON Package FOR EACH ROW WHEN is_triggers_enabled() AND OLD._WorkId=0 BEGIN UPDATE Sequence SET LastValue=LastValue+1 WHERE Id=1;INSERT OR REPLACE INTO PackageChangelog(_Revision, _WorkId, _Created, _Deleted, PackageFullName, _PackageID, WhenOccurred, _Dictionary)SELECT 1, workid(), OLD._Created, s.LastValue, OLD.PackageFullName, OLD._PackageID, now(), NULL FROM Sequence AS s WHERE s.Id=1;END;
CREATE TRIGGER TRG_AFTERDELETE_PrimaryTileUser_Key AFTER DELETE ON PrimaryTileUser FOR EACH ROW WHEN is_triggers_enabled() AND OLD._WorkId=0 BEGIN UPDATE Sequence SET LastValue=LastValue+1 WHERE Id=1;INSERT OR REPLACE INTO PrimaryTileUserChangelog(_Revision, _WorkId, _Created, _Deleted, User, TileUniqueId, WhenOccurred, _Dictionary)SELECT 1, workid(), OLD._Created, s.LastValue, OLD.User, OLD.TileUniqueId, now(), NULL FROM Sequence AS s WHERE s.Id=1;END;
CREATE TRIGGER TRG_AFTERDELETE_SecondaryTileUser_Key AFTER DELETE ON SecondaryTileUser FOR EACH ROW WHEN is_triggers_enabled() AND OLD._WorkId=0 BEGIN UPDATE Sequence SET LastValue=LastValue+1 WHERE Id=1;INSERT OR REPLACE INTO SecondaryTileUserChangelog(_Revision, _WorkId, _Created, _Deleted, User, TileUniqueId, WhenOccurred, _Dictionary)SELECT 1, workid(), OLD._Created, s.LastValue, OLD.User, OLD.TileUniqueId, now(), NULL FROM Sequence AS s WHERE s.Id=1;END;
CREATE TRIGGER TRG_AFTERINSERT_Application AFTER INSERT ON Application FOR EACH ROW BEGIN INSERT OR IGNORE INTO ApplicationIdentity (ApplicationUserModelId) VALUES(NEW.ApplicationUserModelId);UPDATE Sequence SET LastValue=LastValue+1 WHERE Id=2 ;INSERT INTO SRJournal(_Revision, _WorkId, ObjectType, Action, ObjectId, PackageIdentity, ApplicationIdentity, WhenOccurred, SequenceId)SELECT 1, workid(), 3, 1, NEW._ApplicationID, pi._PackageIdentityID, ai._ApplicationIdentityID, now(), s.LastValue FROM Sequence AS s CROSS JOIN PackageIdentity AS pi CROSS JOIN Package AS p CROSS JOIN ApplicationIdentity AS ai WHERE s.Id=2 AND pi.PackageFullName=p.PackageFullName AND p._PackageID=NEW.Package AND ai.ApplicationUserModelId=NEW.ApplicationUserModelId;END;
CREATE TRIGGER TRG_AFTERINSERT_Package AFTER INSERT ON Package FOR EACH ROW BEGIN INSERT OR IGNORE INTO PackageIdentity (PackageFamily, PackageFullName) VALUES(NEW.PackageFamily, NEW.PackageFullName);UPDATE Sequence SET LastValue=LastValue+1 WHERE Id=2 ;INSERT INTO SRJournal(_Revision, _WorkId, ObjectType, Action, ObjectId, PackageIdentity, WhenOccurred, SequenceId)SELECT 1, workid(), 1, 1, NEW._PackageID, pi._PackageIdentityID, now(), s.LastValue FROM Sequence AS s CROSS JOIN PackageIdentity AS pi WHERE s.Id=2 AND pi.PackageFullName=NEW.PackageFullName;END;
CREATE TRIGGER TRG_AFTERINSERT_PackageFamily_SRJournal AFTER INSERT ON PackageFamily FOR EACH ROW BEGIN UPDATE Sequence SET LastValue=LastValue+1 WHERE Id=2 ;INSERT INTO SRJournal(_Revision, _WorkId, ObjectType, Action, ObjectId, PackageFamily, WhenOccurred, SequenceId)SELECT 1, workid(), 5, 1, NEW._PackageFamilyID, NEW._PackageFamilyID, now(), s.LastValue FROM Sequence AS s WHERE s.Id=2 ;END;
CREATE TRIGGER TRG_AFTERINSERT_PackageUser_Key AFTER INSERT ON PackageUser FOR EACH ROW WHEN is_triggers_enabled() AND NEW._WorkId=0 AND NEW._Created=0 BEGIN DELETE FROM PackageUserChangelog WHERE NEW._Created=0 AND User=NEW.User AND User=NEW.User AND Package=NEW.Package;END;
CREATE TRIGGER TRG_AFTERINSERT_PackageUser_PackageFamilyUser AFTER INSERT ON PackageUser FOR EACH ROW WHEN is_triggers_enabled()BEGIN INSERT OR IGNORE INTO PackageFamilyUser (PackageFamily, User, WhenInstalled, _Revision)SELECT p.PackageFamily, NEW.User, now(), 1 FROM Package AS p INNER JOIN PackageUser AS pu ON pu.Package=p._PackageID WHERE (SELECT EXISTS(SELECT 1 FROM User WHERE _UserID=NEW.User AND UserSid<>X’010100000000000512000000′))AND NEW.Package=p._PackageID;END;
CREATE TRIGGER TRG_AFTERINSERT_PackageUser_SRJournal AFTER INSERT ON PackageUser FOR EACH ROW BEGIN UPDATE Sequence SET LastValue=LastValue+1 WHERE Id=2 ;INSERT INTO SRJournal(_Revision, _WorkId, ObjectType, Action, ObjectId, User, PackageIdentity, WhenOccurred, SequenceId)SELECT 1, workid(), 2, 1, NEW._PackageUserID, NEW.User, pi._PackageIdentityID, now(), s.LastValue FROM Sequence AS s CROSS JOIN Package AS p CROSS JOIN PackageIdentity AS pi ON pi.PackageFullName=p.PackageFullName WHERE s.Id=2 AND p._PackageID=NEW.Package AND pi.PackageFullName=p.PackageFullName;END;
CREATE TRIGGER TRG_AFTERINSERT_Package_Key AFTER INSERT ON Package FOR EACH ROW WHEN is_triggers_enabled() AND NEW._WorkId=0 AND NEW._Created=0 BEGIN DELETE FROM PackageChangelog WHERE NEW._Created=0 AND PackageFullName=NEW.PackageFullName;END;
CREATE TRIGGER TRG_AFTERINSERT_PrimaryTileUser_Key AFTER INSERT ON PrimaryTileUser FOR EACH ROW WHEN is_triggers_enabled() AND NEW._WorkId=0 AND NEW._Created=0 BEGIN DELETE FROM PrimaryTileUserChangelog WHERE NEW._Created=0 AND User=NEW.User AND TileUniqueId=NEW.TileUniqueId;END;
CREATE TRIGGER TRG_AFTERINSERT_SecondaryTileUser_Key AFTER INSERT ON SecondaryTileUser FOR EACH ROW WHEN is_triggers_enabled() AND NEW._WorkId=0 AND NEW._Created=0 BEGIN DELETE FROM SecondaryTileUserChangelog WHERE NEW._Created=0 AND User=NEW.User AND TileUniqueId=NEW.TileUniqueId;END;
CREATE TRIGGER TRG_AFTERINSERT_User_SRJournal AFTER INSERT ON User FOR EACH ROW BEGIN UPDATE Sequence SET LastValue=LastValue+1 WHERE Id=2 ;INSERT INTO SRJournal(_Revision, _WorkId, ObjectType, Action, ObjectId, User, WhenOccurred, SequenceId)SELECT 1, workid(), 4, 1, NEW._UserID, NEW._UserID, now(), s.LastValue FROM Sequence AS s WHERE s.Id=2 ;END;
CREATE TRIGGER TRG_AFTERUPDATE_PackageUser__Created_LongRunningTransactionUpdateDuringCommit AFTER UPDATE OF _Created ON PackageUser FOR EACH ROW WHEN OLD._Created=-2 AND NEW._Created>0 BEGIN DELETE FROM PackageUserChangelog WHERE User=NEW.User AND Package=NEW.Package;END;
CREATE TRIGGER TRG_AFTERUPDATE_Package__Created_LongRunningTransactionUpdateDuringCommit AFTER UPDATE OF _Created ON Package FOR EACH ROW WHEN OLD._Created=-2 AND NEW._Created>0 BEGIN DELETE FROM PackageChangelog WHERE PackageFullName=NEW.PackageFullName;END;
CREATE TRIGGER TRG_AFTER_UPDATE_Application_SRJournal AFTER UPDATE ON Application FOR EACH ROW BEGIN UPDATE Sequence SET LastValue=LastValue+1 WHERE Id=2 ;INSERT INTO SRJournal(_Revision, _WorkId, ObjectType, Action, ObjectId, PackageIdentity, ApplicationIdentity, WhenOccurred, SequenceId)SELECT 1, workid(), 3, 2, NEW._ApplicationID, pi._PackageIdentityID, ai._ApplicationIdentityID, now(), s.LastValue FROM Sequence AS s CROSS JOIN PackageIdentity AS pi CROSS JOIN Package AS p CROSS JOIN ApplicationIdentity AS ai WHERE s.Id=2 AND pi.PackageFullName=p.PackageFullName AND p._PackageID=NEW.Package AND ai.ApplicationUserModelId=NEW.ApplicationUserModelId;END;
CREATE TRIGGER TRG_AFTER_UPDATE_PackageFamily_SRJournal AFTER UPDATE ON PackageFamily FOR EACH ROW BEGIN UPDATE Sequence SET LastValue=LastValue+1 WHERE Id=2 ;INSERT INTO SRJournal(_Revision, _WorkId, ObjectType, Action, ObjectId, PackageFamily, WhenOccurred, SequenceId)SELECT 1, workid(), 5, 2, NEW._PackageFamilyID, NEW._PackageFamilyID, now(), s.LastValue FROM Sequence AS s WHERE s.Id=2 ;END;
CREATE TRIGGER TRG_AFTER_UPDATE_PackageUser_SRJournal AFTER UPDATE ON PackageUser FOR EACH ROW BEGIN UPDATE Sequence SET LastValue=LastValue+1 WHERE Id=2 ;INSERT INTO SRJournal(_Revision, _WorkId, ObjectType, Action, ObjectId, User, PackageIdentity, WhenOccurred, SequenceId)SELECT 1, workid(), 2, 2, NEW._PackageUserID, NEW.User, pi._PackageIdentityID, now(), s.LastValue FROM Sequence AS s CROSS JOIN Package AS p CROSS JOIN PackageIdentity AS pi ON pi.PackageFullName=p.PackageFullName WHERE s.Id=2 AND p._PackageID=NEW.Package AND pi.PackageFullName=p.PackageFullName;END;
CREATE TRIGGER TRG_AFTER_UPDATE_Package_SRJournal AFTER UPDATE ON Package FOR EACH ROW BEGIN UPDATE Sequence SET LastValue=LastValue+1 WHERE Id=2 ;INSERT INTO SRJournal(_Revision, _WorkId, ObjectType, Action, ObjectId, PackageIdentity, WhenOccurred, SequenceId)SELECT 1, workid(), 1, 2, NEW._PackageID, pi._PackageIdentityID, now(), s.LastValue FROM Sequence AS s CROSS JOIN PackageIdentity AS pi WHERE s.Id=2 AND pi.PackageFullName=NEW.PackageFullName;END;
CREATE TRIGGER TRG_AFTER_UPDATE_User_SRJournal AFTER UPDATE ON User FOR EACH ROW BEGIN UPDATE Sequence SET LastValue=LastValue+1 WHERE Id=2 ;INSERT INTO SRJournal(_Revision, _WorkId, ObjectType, Action, ObjectId, User, WhenOccurred, SequenceId)SELECT 1, workid(), 4, 2, NEW._UserID, NEW._UserID, now(), s.LastValue FROM Sequence AS s WHERE s.Id=2 ;END;
CREATE TRIGGER TRG_BEFOREDELETE_Application_SRJournal BEFORE DELETE ON Application FOR EACH ROW BEGIN UPDATE Sequence SET LastValue=LastValue+1 WHERE Id=2 ;INSERT INTO SRJournal(_Revision, _WorkId, ObjectType, Action, ObjectId, PackageIdentity, ApplicationIdentity, WhenOccurred, SequenceId)SELECT 1, workid(), 3, 3, OLD._ApplicationID, pi._PackageIdentityID, ai._ApplicationIdentityID, now(), s.LastValue FROM Sequence AS s CROSS JOIN PackageIdentity AS pi CROSS JOIN Package AS p CROSS JOIN ApplicationIdentity AS ai WHERE s.Id=2 AND pi.PackageFullName=p.PackageFullName AND p._PackageID=OLD.Package AND ai.ApplicationUserModelId=OLD.ApplicationUserModelId;END;
CREATE TRIGGER TRG_BEFOREDELETE_PackageFamily_SRJournal BEFORE DELETE ON PackageFamily FOR EACH ROW BEGIN UPDATE Sequence SET LastValue=LastValue+1 WHERE Id=2 ;INSERT INTO SRJournal(_Revision, _WorkId, ObjectType, Action, ObjectId, PackageFamily, WhenOccurred, SequenceId)SELECT 1, workid(), 5, 3, OLD._PackageFamilyID, OLD._PackageFamilyID, now(), s.LastValue FROM Sequence AS s WHERE s.Id=2 ;END;
CREATE TRIGGER TRG_BEFOREDELETE_PackageUser_PackageFamilyUser BEFORE DELETE ON PackageUser FOR EACH ROW WHEN is_triggers_enabled()BEGIN DELETE FROM PackageFamilyUser WHERE (SELECT EXISTS(SELECT 1 FROM User WHERE _UserID=OLD.User AND UserSid<> X’010100000000000512000000′))AND User=OLD.User AND PackageFamily IN (SELECT p.PackageFamily FROM Package AS p INNER JOIN PackageUser AS pu ON pu.Package=p._PackageID WHERE OLD.Package=pu.Package AND OLD.User=pu.User LIMIT 1) AND (SELECT EXISTS(SELECT 1 WHERE (SELECT COUNT(*) AS count FROM PackageUser AS pu INNER JOIN Package AS p ON p.rowid=pu.Package WHERE p.PackageFamily IN (SELECT p.PackageFamily FROM Package AS p INNER JOIN PackageUser AS pu ON pu.Package=p._PackageID WHERE OLD.Package=pu.Package AND OLD.User=pu.User)) <= 1));END;
CREATE TRIGGER TRG_BEFOREDELETE_PackageUser_SRJournal BEFORE DELETE ON PackageUser FOR EACH ROW BEGIN UPDATE Sequence SET LastValue=LastValue+1 WHERE Id=2 ;INSERT INTO SRJournal(_Revision, _WorkId, ObjectType, Action, ObjectId, User, PackageIdentity, WhenOccurred, SequenceId)SELECT 1, workid(), 2, 3, OLD._PackageUserID, OLD.User, pi._PackageIdentityID, now(), s.LastValue FROM Sequence AS s CROSS JOIN Package AS p CROSS JOIN PackageIdentity AS pi ON pi.PackageFullName=p.PackageFullName WHERE s.Id=2 AND p._PackageID=OLD.Package AND pi.PackageFullName=p.PackageFullName;END;
CREATE TRIGGER TRG_BEFOREDELETE_Package_SRJournal BEFORE DELETE ON Package FOR EACH ROW BEGIN UPDATE Sequence SET LastValue=LastValue+1 WHERE Id=2 ;INSERT INTO SRJournal(_Revision, _WorkId, ObjectType, Action, ObjectId, PackageIdentity, WhenOccurred, SequenceId)SELECT 1, workid(), 1, 3, OLD._PackageID, pi._PackageIdentityID, now(), s.LastValue FROM Sequence AS s CROSS JOIN PackageIdentity AS pi WHERE s.Id=2 AND pi.PackageFullName=OLD.PackageFullName;END;
CREATE TRIGGER TRG_BEFOREDELETE_SRJournal_SRJournalArchive BEFORE DELETE ON SRJournal FOR EACH ROW WHEN sroptions() & 0x00100000 != 0 BEGIN INSERT INTO SRJournalArchive(_Revision, _WorkId, ObjectType, “Action”, ObjectId, Flags,User, PackageFamily, PackageIdentity, ApplicationIdentity,WhenOccurred, SequenceId, _Dictionary)SELECT OLD._Revision, OLD._WorkId, OLD.ObjectType, OLD.”Action”, OLD.ObjectId, OLD.Flags,OLD.User, OLD.PackageFamily, OLD.PackageIdentity, OLD.ApplicationIdentity,OLD.WhenOccurred, OLD.SequenceId, OLD._Dictionary;END;
CREATE TRIGGER TRG_BEFOREDELETE_User_SRJournal BEFORE DELETE ON User FOR EACH ROW BEGIN UPDATE Sequence SET LastValue=LastValue+1 WHERE Id=2 ;INSERT INTO SRJournal(_Revision, _WorkId, ObjectType, Action, ObjectId, User, WhenOccurred, SequenceId)SELECT 1, workid(), 4, 3, OLD._UserID, OLD._UserID, now(), s.LastValue FROM Sequence AS s WHERE s.Id=2 ;END;
CREATE TRIGGER TRG_IDX_ActivityContext_ProductId BEFORE INSERT ON ActivityContext FOR EACH ROW BEGIN SELECT CASE WHEN ((SELECT _ActivityContextID FROM ActivityContext WHERE ProductId IS NEW.ProductId) IS NOT NULL)THEN RAISE(ABORT, ‘INSERT INTO “ActivityContext” violates the unique index “IDX_ActivityContext_ProductId”‘)END;END;
CREATE TRIGGER TRG_IDX_AppUriHandler_ProgID_Extension BEFORE INSERT ON AppUriHandler FOR EACH ROW BEGIN SELECT CASE WHEN ((SELECT _AppUriHandlerID FROM AppUriHandler WHERE ProgID IS NEW.ProgID AND Extension=NEW.Extension) IS NOT NULL)THEN RAISE(ABORT, ‘INSERT INTO “AppUriHandler” violates the unique index “IDX_AppUriHandler_ProgID_Extension”‘)END;END;
CREATE TRIGGER TRG_IDX_AppxExtension_User_Package_Category_KeyString_RegistrationInformation BEFORE INSERT ON AppxExtension FOR EACH ROW BEGIN SELECT CASE WHEN ((SELECT _AppxExtensionID FROM AppxExtension WHERE User=NEW.User AND Package=NEW.Package AND Category=NEW.Category AND KeyString IS NEW.KeyString AND RegistrationInformation=NEW.RegistrationInformation) IS NOT NULL)THEN RAISE(ABORT, ‘INSERT INTO “AppxExtension” violates the unique index “IDX_AppxExtension_User_Package_Category_KeyString_RegistrationInformation”‘)END;END;
CREATE TRIGGER TRG_IDX_BackgroundServiceAgent_ProductId_TaskId_BackgroundSpecifier_BackgroundName_BackgroundSource_BackgroundType__WorkId BEFORE INSERT ON BackgroundServiceAgent FOR EACH ROW BEGIN SELECT CASE WHEN ((SELECT _BackgroundServiceAgentID FROM BackgroundServiceAgent WHERE ProductId=NEW.ProductId AND TaskId=NEW.TaskId AND BackgroundSpecifier IS NEW.BackgroundSpecifier AND BackgroundName IS NEW.BackgroundName AND BackgroundSource IS NEW.BackgroundSource AND BackgroundType IS NEW.BackgroundType AND _WorkId=NEW._WorkId) IS NOT NULL)THEN RAISE(ABORT, ‘INSERT INTO “BackgroundServiceAgent” violates the unique index “IDX_BackgroundServiceAgent_ProductId_TaskId_BackgroundSpecifier_BackgroundName_BackgroundSource_BackgroundType__WorkId”‘)END;END;
CREATE TRIGGER TRG_IDX_BundlePackage_Bundle_Version_Architecture_ResourceId__WorkId BEFORE INSERT ON BundlePackage FOR EACH ROW BEGIN SELECT CASE WHEN ((SELECT _BundlePackageID FROM BundlePackage WHERE Bundle=NEW.Bundle AND Version=NEW.Version AND Architecture=NEW.Architecture AND ResourceId IS NEW.ResourceId AND _WorkId=NEW._WorkId AND Bundle<>0) IS NOT NULL)THEN RAISE(ABORT, ‘INSERT INTO “BundlePackage” violates the unique index “IDX_BundlePackage_Bundle_Version_Architecture_ResourceId__WorkId”‘)END;END;
CREATE TRIGGER TRG_IDX_DynamicAppUriHandler_ProgID_DynamicAppUriHandlerGroup BEFORE INSERT ON DynamicAppUriHandler FOR EACH ROW BEGIN SELECT CASE WHEN ((SELECT _DynamicAppUriHandlerID FROM DynamicAppUriHandler WHERE ProgID IS NEW.ProgID AND DynamicAppUriHandlerGroup=NEW.DynamicAppUriHandlerGroup) IS NOT NULL)THEN RAISE(ABORT, ‘INSERT INTO “DynamicAppUriHandler” violates the unique index “IDX_DynamicAppUriHandler_ProgID_DynamicAppUriHandlerGroup”‘)END;END;
CREATE TRIGGER TRG_IDX_OptionalBundlePackage_OptionalBundle_Version_Architecture_ResourceId__WorkId BEFORE INSERT ON OptionalBundlePackage FOR EACH ROW BEGIN SELECT CASE WHEN ((SELECT _OptionalBundlePackageID FROM OptionalBundlePackage WHERE OptionalBundle=NEW.OptionalBundle AND Version=NEW.Version AND Architecture=NEW.Architecture AND ResourceId IS NEW.ResourceId AND _WorkId=NEW._WorkId AND OptionalBundle<>0) IS NOT NULL)THEN RAISE(ABORT, ‘INSERT INTO “OptionalBundlePackage” violates the unique index “IDX_OptionalBundlePackage_OptionalBundle_Version_Architecture_ResourceId__WorkId”‘)END;END;
CREATE TRIGGER TRG_IDX_Package_PackageFamily_ResourceId_Architecture_Version__WorkId BEFORE INSERT ON Package FOR EACH ROW BEGIN SELECT CASE WHEN ((SELECT _PackageID FROM Package WHERE PackageFamily=NEW.PackageFamily AND ResourceId IS NEW.ResourceId AND Architecture=NEW.Architecture AND Version=NEW.Version AND _WorkId=NEW._WorkId) IS NOT NULL)THEN RAISE(ABORT, ‘INSERT INTO “Package” violates the unique index “IDX_Package_PackageFamily_ResourceId_Architecture_Version__WorkId”‘)END;END;
CREATE TRIGGER TRG_IDX_PublisherCacheFolder_PackageExtension_FolderName BEFORE INSERT ON PublisherCacheFolder FOR EACH ROW BEGIN SELECT CASE WHEN ((SELECT _PublisherCacheFolderID FROM PublisherCacheFolder WHERE PackageExtension=NEW.PackageExtension AND FolderName IS NEW.FolderName) IS NOT NULL)THEN RAISE(ABORT, ‘INSERT INTO “PublisherCacheFolder” violates the unique index “IDX_PublisherCacheFolder_PackageExtension_FolderName”‘)END;END;
CREATE TRIGGER TRG_IDX_WorkInProgress_Key BEFORE INSERT ON WorkInProgress FOR EACH ROW BEGIN SELECT CASE WHEN ((SELECT _WorkInProgressID FROM WorkInProgress WHERE “Key” IS NEW.”Key”) IS NOT NULL)THEN RAISE(ABORT, ‘INSERT INTO “WorkInProgress” violates the unique index “IDX_WorkInProgress_Key”‘)END;END;
CREATE TRIGGER TRG_IDX_XapExtension_Consumer_Supplier_ExtensionCategory_ExtensionId_SupplierTaskId__WorkId BEFORE INSERT ON XapExtension FOR EACH ROW BEGIN SELECT CASE WHEN ((SELECT _XapExtensionID FROM XapExtension WHERE Consumer IS NEW.Consumer AND Supplier=NEW.Supplier AND ExtensionCategory=NEW.ExtensionCategory AND ExtensionId=NEW.ExtensionId AND SupplierTaskId=NEW.SupplierTaskId AND _WorkId=NEW._WorkId) IS NOT NULL)THEN RAISE(ABORT, ‘INSERT INTO “XapExtension” violates the unique index “IDX_XapExtension_Consumer_Supplier_ExtensionCategory_ExtensionId_SupplierTaskId__WorkId”‘)END;END;
CREATE TRIGGER TRG_IDX_Xap_ProductId__WorkId BEFORE INSERT ON Xap FOR EACH ROW BEGIN SELECT CASE WHEN ((SELECT _XapID FROM Xap WHERE ProductId IS NEW.ProductId AND _WorkId=NEW._WorkId) IS NOT NULL)THEN RAISE(ABORT, ‘INSERT INTO “Xap” violates the unique index “IDX_Xap_ProductId__WorkId”‘)END;END;
Close the DB Browser, and open PowerShell. Check for remaining provisioned packages against users (the output of this should be blank)
Get-AppxPackage -AllUsers | foreach {
$row = $_
$row.PackageUserInformation | foreach {
$info = $_
[pscustomobject]@{Package=$row.packagefullname
user=$info.UserSecurityId.sid
username=$info.UserSecurityId.Username
installstate=$info.installstate}}}
Ideally at this point, shutdown the VM and take another snapshot before attempting to run sysprep.
I would also highly recommending connecting via the VMware console as opposed to RDP to run sysprep so you can see what is actually happening (otherwise you’ll lose connection via RDP before sysprep completes running and you’ll never know if it failed or not).
If sysprep does fails, check C:\Windows\System32\Sysprep\Panther\setuperr.log to see what package you missed. Revert your snapshot, launch the DB Browser for SQLite again, delete the triggers, then clean up the missed package, recreate the triggers, reboot, and try your sysprep again. It may take you a few attempts to fully clean up all the necessary packages before sysprep successfully completes, but eventually you’ll get there!
Keep in mind – this is totally unsupported by Microsoft, and who knows what this may break in the future… Use the above instructions completley at your own risk!!!
Recently, I had a customer go through a merger, and they inherited another StoreOnce located at a remote site. We made the decision to enable Catalyst copy from the customer’s existing StoreOnce to the inherited StoreOnce to enhance the customers backup and recovery strategy. The only issue was the size of the existing StoreOnce Catalyst store was larger than the available capacity on the inherited StoreOnce, which already had the capacity expansion licensed and installed.
Upon further investigation I discovered that the customer’s Catalyst store had several thousand orphaned Veeam backups from over the years that were no longer present in the VBR database, nor where they picked up by Veeam when rescanning the repository. Deleting these orphaned Veeam files would easily free up enough space in the source Catalyst store to match what was available in the in inherited StoreOnce. All I needed to do was delete these orphaned files!
This however was much easier to say than to do. Because Veeam wasn’t detecting them, I couldn’t use the VBR interface to just select them and delete them from disk. The StoreOnce 4.x WebUI includes the option to list the items in the Catalyst store, and delete them. Unfortunately, it only allows you to select one item at a time, then click delete, and then click through an “are you sure” warning. All told, it probably takes about 8 to 11 seconds per item to delete it, then you need to navigate through the items list again to find the next aged item and repeat this process. This is fine if you only have a handful of items you need to delete. I had somewhere beyond 5800 items to cleanup!
I recalled that HPE offers a tool called “HPE StoreOnce Catalyst Copy Utility”. It is specifically designed to be used to copy backup items to alternate StoreOnce appliances for safekeeping, delete backups that are obsolete or orphaned, and synchronize backup copies between a primary backup target and a disaster recovery site. It can be downloaded from the HPE Software Center (https://myenterpriselicense.hpe.com). What I found out though is the documentation with regards creating the credential file is a bit sparse, so I’m going to take the time explain how to actually use the tool here.
And as always before I begin:
Use any tips, tricks, or scripts I post at your own risk.
Once you have downloaded the tool from the HPE Software Center, run the installer and accept all the defaults. If you are on a Windows machine, this means it’s going to install to C:\Program Files\HPE\StoreOnce\isvsupport\HPE-Catalyst-CATTOOLS
The HPE StoreOnce Catalyst Copy Utility is strictly a console based app – there is no GUI at all. To get started, open an Administrative Command Prompt and navigate to C:\Program Files\HPE\StoreOnce\isvsupport\HPE-Catalyst-CATTOOLS\bin
The first thing you need to do is create an encrypted password file for your Catalyst store. To do this, you run:
Note – the UserName is the username with permissions to the Catalyst Store, which may or may not be the same as the Admin password to the StoreOnce (in fact, from a security perspective, it should be totally different!). If you copy and pasted these command lines, take note that your browser may replace the double dash with a single dash causing the commands to fail.
(You’ll also note that some of my screenshots are blurred and some are not… I got side tracked in the middle of writing this and became lazy since there really isn’t anything here that is secret anyways).
Now that we have our password, lets make sure can connect to the Catalyst Store. To do this, run:
You should get a summary back similar to below that shows the current Catalyst Copy Jobs status.
Back in the WebUI, I’ve filtered by “create date” to find those really old orphaned backups. In my example here, I’m going to remove all the files created prior to May 24 (which is 5 files in this example – and will also break the Veeam backup chain for a couple of them – just something to keep in mind!)
To delete these files with HPE StoreOnce Catalyst Copy Utility, the syntax is:
As you can see, the HPE StoreOnce Catalyst Copy Utility has removed the 5 files older than May 24, 2020. It took only a few seconds in total.
And these deletions are now reflected in the WebUI once I refresh it.
For a full list of the options, advanced filters, and settings related to the HPE StoreOnce Catalyst Copy Utility, be sure to download the user guide from the same page you downloaded the utility from at the HPE Software Center.
And the 5800+ items I had to purge? It was around 294 TiB of capacity and it took a little under 2 hours to complete with this method. The StoreOnce Housekeeping Space Reclamation process is working away at reclaiming all that capacity now.
It’s no secret that I exclusively utilize HPE’s oem’d Marvell Ethernet and FC adapters in not only my own servers, but all of my customers servers too. For the most part, they work great, they are feature rich compared to the competition, and lets face it, they are cost effective. The downside is that the firmware updating process provided by HPE is not overly robust, and has more than once left me with a bricked adapter. Once bricked, the adapter still appears in the ILO and server inventory, but doesn’t show any ports, MAC addresses, etc. So then I have to wait for HPE PointNext to dispatch a field tech to replace the bricked card because apparently they do not know how to fix it.
While troubleshooting another issue a while back with both the HPE ILO and Marvell Ethernet firmware development teams, the topic of bricked, borked, or otherwise dead adapters after failed HPE firmware updates came up. One of the Marvell engineers shared with me how to bring these adapters back to life, and I’m going to re-share that here. It’s a relatively easy process, and saves you from having to call to HPE support and waiting for PointNext to come replace it.
My screenshots below are based on a DL380 Gen9. As near as I can tell, this works on both Intel and AMD based Gen9 and Gen10 servers (I have definitely tested it on DL360 Gen9, DL360 Gen10, DL380 Gen9, DL380 Gen, DL325 Gen10 and DL385 Gen10). So just because the screenshots below may not look exactly like your system, the same basic steps will apply.
And as always before I begin:
Use any tips, tricks, or scripts I post at your own risk.
First, you need to extract the current firmware from the HPE executable with 7-Zip. Ideally you’ll want just the firmware .bin file in it’s own folder.
Next open Internet Explorer, log into the ILO and opened the .NET ILO console. Reboot the server to the RBSU and select embedded applications.
From the Virtual Drives drop down menu, select Folder. If you do not see Folder listed there, then you did not use Internet Explorer and / or the .NET ILO console, which is required to be able to mount a folder via the ILO.
Navigated to the folder where the extracted the firmware is and picked the folder that had the .bin file in it.
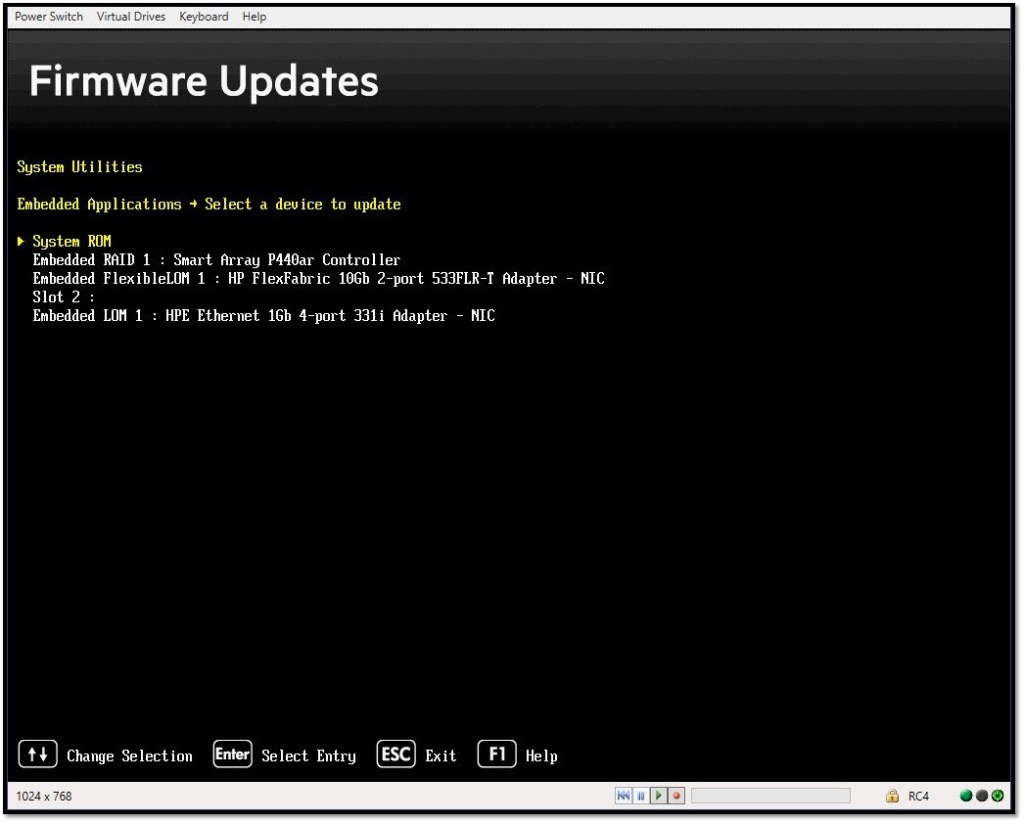
Select Firmware Update from the list of Embedded Applications, then select the adapter that requires reflashing from the list of devices.
*** Note that depending on the bricked-ness of the adapter – it may not actually appear as it’s real name – but it should be obvious which device it is by process of elimination.
At the Firmware Updates menu, select “Select a firmware file” (**note – this particular 533FLR-T used in these screenshots is not bricked and the “Current Firmware Version” on this 533FLR-T is actually what I’m reflashing with, so the pictures may be differ slightly from what you see on screen)…
When prompted, select “[iLO Folder] iLO Virtual USB 1 : HP iLO Virtual USB Key”.
**Note – the naming of this varies depending on the BIOS version and generation of the Proliant – but the iLO Folder should be obvious in the list.
Select the firmware .bin file from the list presented…
**Note – with Gen10, I’ve noticed that sometimes the file names are truncated to 8.3, so this is why I suggest having only the .bin file in the folder presented via the ILO as it makes it alot easier to pick the right file then!
The new firmware file will load. It generally about 10 to 15s.
Hit Start Firmware Update (as shown in the prior screenshot 3 above)…
The update process will take between 30 and 60s generally.
Once completed, exit back to the RBSU, and cold boot the host via the ILO.
Upon reboot – your Ethernet card will be back alive and ready to go again!
In addition to my previous blog post of upgrading a list of ILO 4’s firmware via PowerShell, I also wrote a similar script for ILO 5. However this script makes use of the iLO Repository and the .fwpkg file type, and does not rely on an IIS server for the ILO to pull the firmware file from. Other than that, it functions very similar to the ILO 4 update script I previously posted.
Below is my PowerShell code. You’ll need to adjust it as required for your own environment. Be sure to update the items in red where required.
And as always: Use any tips, tricks, or scripts I post at your own risk. ### get ILORest here - https://downloads.hpe.com/pub/softlib2/software1/pubsw-windows/p1440367746/v177187/ilorest-3.0.1.0-8.x86_64.msi
Recently, I had to update a bunch of HPE ILO 4s at multiple locations. Most of my managed sites have between 3 and 9 ILOs that need updated when HPE pushes out an ILO firmware update. I could have used ILO federation group firmware update, or the ILO Amplifier Pack to do this, but I’m a fan of scripting things so I just have to RDP a server onsite, open a prompt and paste a few lines of code and let it start doing it’s thing, then RDP the next site and do the same thing. So I built a PowerShell script to download the ILO 4 update, extract the .bin file, copy it an IIS server, and then proceed to upgrade each ILO one a time utilizing the ILO RestAPI.
Below is my PowerShell code. You’ll need to adjust it as required for your own environment. Be sure to update the items in red where required. Keep in mind your IIS server ($iisip) will need to have a mime type associated with bin files for this to work.
And as always:
Use any tips, tricks, or scripts I post at your own risk.
### get ILORest here if you need it - https://downloads.hpe.com/pub/softlib2/software1/pubsw-windows/p1440367746/v177187/ilorest-3.0.1.0-8.x86_64.msi


You must be logged in to post a comment.